This is part 2 of 4 of the article series. Part 1 is “Network installation with the Microsoft Deployment Toolkit – Part 1: Guidelines, preparation and setup”.
Configuring a Service Account
To access the network share, create computer accounts and perform other functions, a service account should be created for the MDT in Active Directory. This account must be given change permissions in the file system for the hidden share and the corresponding NTFS structure. It is actually sufficient to restrict write access for this user to the “Capture” folder. Read access is sufficient for the rest in this scenario.
Also delegate to this service account the right to create computer objects in the associated OU.
Adding Drivers
When it comes to drivers, it is important to think about them in advance. First, there are two types of drivers for the Microsoft Deployment Toolkit (MDT): Normal drivers and Windows PE (Windows Preinstallation Environment) drivers. The latter are needed in the installation environment that installs Windows. More on this later.
In general, one should be careful with drivers. Technically, I can integrate all drivers into an image and leave it to Plug & Play to choose the right one. Unfortunately, this can sometimes lead to the “Plug & Pray” experience, as it doesn’t always work. In the case of PnP, the optimal driver is selected. If several versions are available, the highest version wins. If the OEM changes the versioning, or a newer version of the driver does not work with an old hardware revision, then it gets exciting.
To avoid this, I add a separate driver pack for each hardware model and will distribute that specifically later in the task sequence. Some manufacturers offer model-specific driver packages or model-family packages, some of which are tested for compatibility with each other. However, this varies from manufacturer to manufacturer. I prefer these collections because I don’t have to download individual drivers or even extract drivers from installation files (EXE files).
What are Windows PE drivers?
There are a few things to keep in mind about PE drivers. Since Windows 10, Windows Preinstallation Environment (WinPE) 10 is used. If you want to distribute older Windows versions, you may have to add drivers for Windows Preinstallation Environment (WinPE) 5.
Since not all hardware needs to be supported for the installation, only certain types of drivers are relevant for PE. For example, chipset drivers, storage systems (RAID controllers, Sata controllers & Co.), network drivers (without these, installation via the network is impossible) and Thunderbolt drivers. I like to use Dell’s WinPE driver package, even for non-Dell based devices, if the manufacturer does not have its own Windows PE driver packages, as it contains a solid base.
Employer disclosure #Iwork4Dell
At the time of writing, I was working for Dell Technologies. However, this article reflects my own personal opinion, and was not sponsored, influenced or rewarded by my employer in any way. #Iwork4Dell
Adding drivers
In this chapter it doesn’t matter if you are dealing with Windows Preinstallation Environment (WinPE) or other driver packages. The steps are identical.
To add the drivers, navigate to the Out-of-Box Drivers section and first create a new folder. It is best to name this the same as the drivers. If your preferred manufacturer also works with versioning for the driver packages, also note the version. In this example, I import the version A19 of the WinPE10 driver pack from Dell, I take the name of the manufacturer for the folder: “WINPE10.0-DRIVERS-A19-KCTW7”.
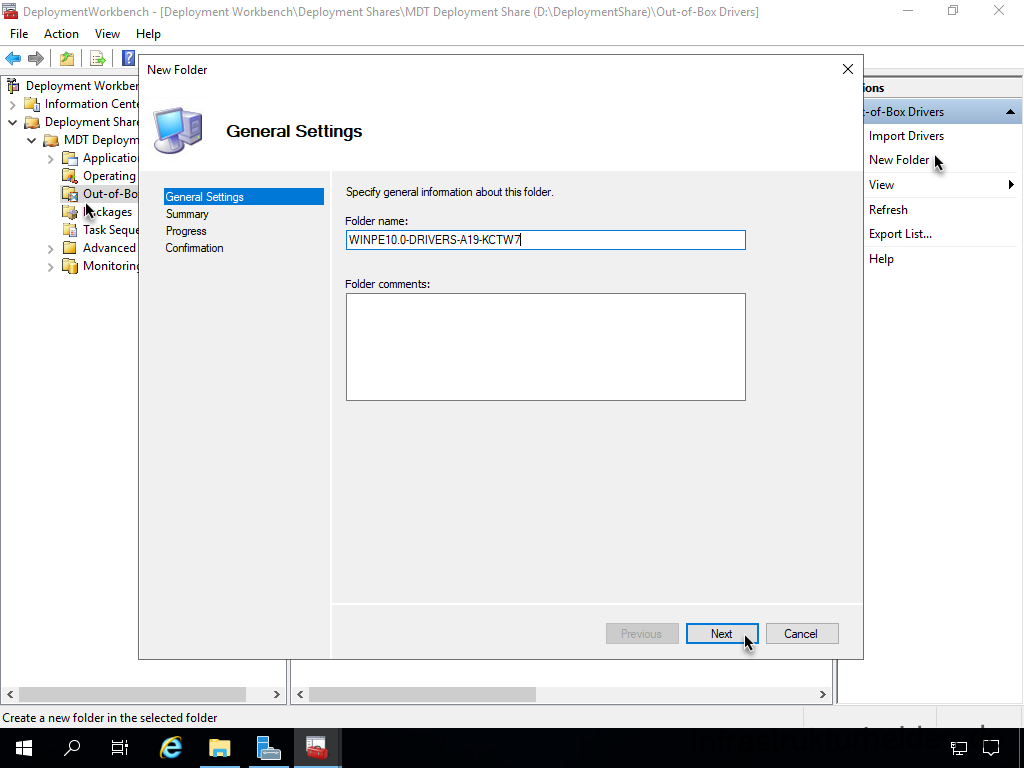
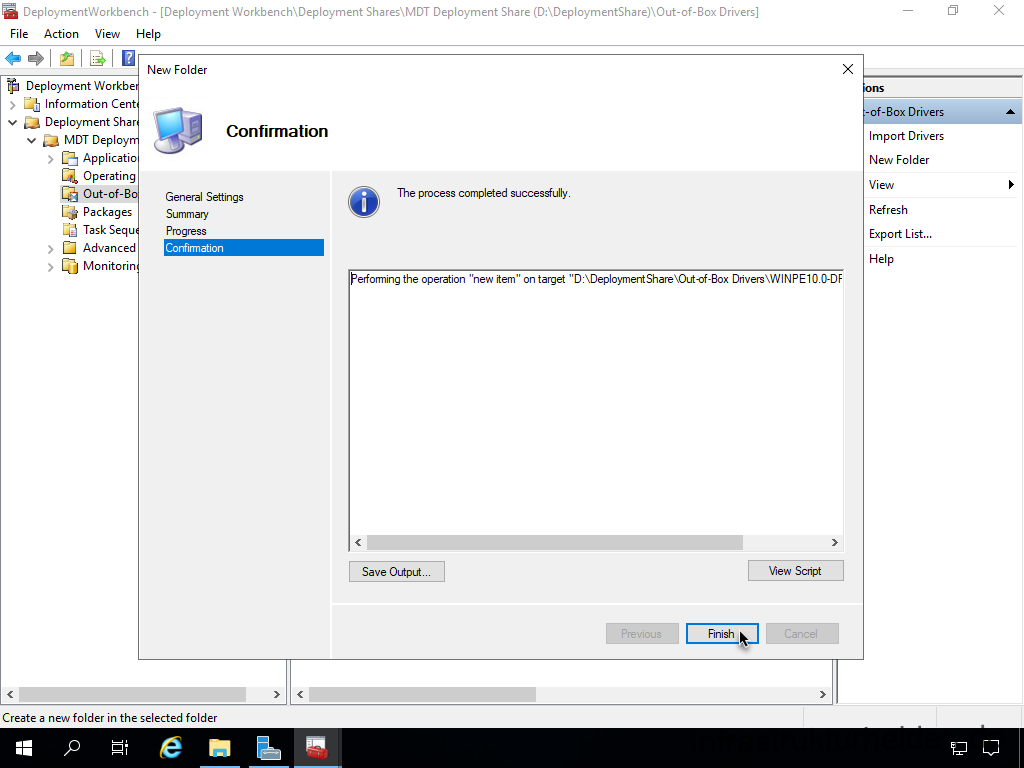
The creation of the new folder is done in a few steps.
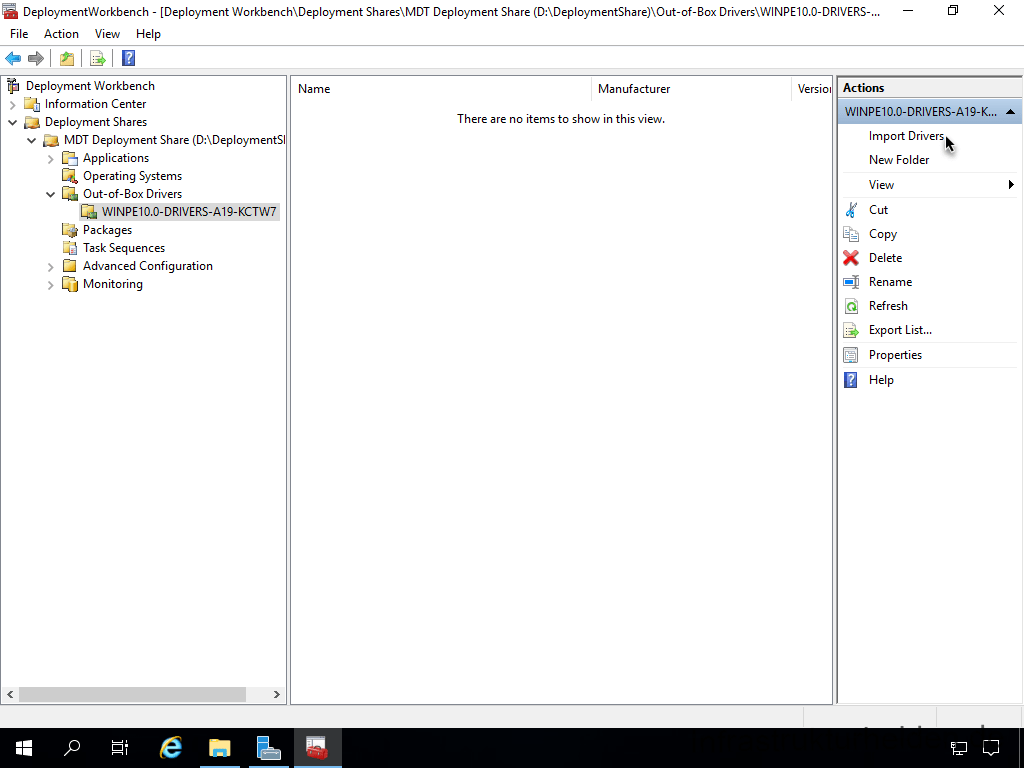
The next step is to import the actual drivers. To do this, change to the appropriate directory and carry out the action “Import Drivers”
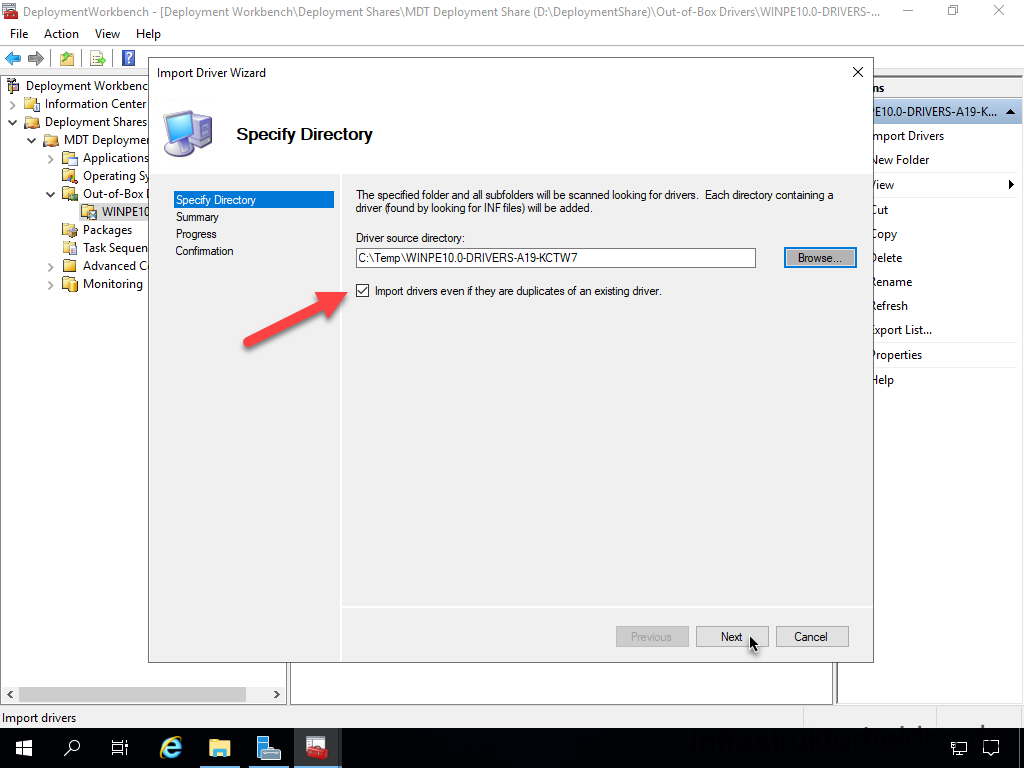
Select the directory and check the checkbox “Import drivers even if they are duplicates of an existing driver”. Otherwise, when working with different driver packages, you may be missing drivers in a later package.
A confirmation screen follows and then the import starts in the next step. This takes time, for example up to 10 minutes for the WinPE driver pack.
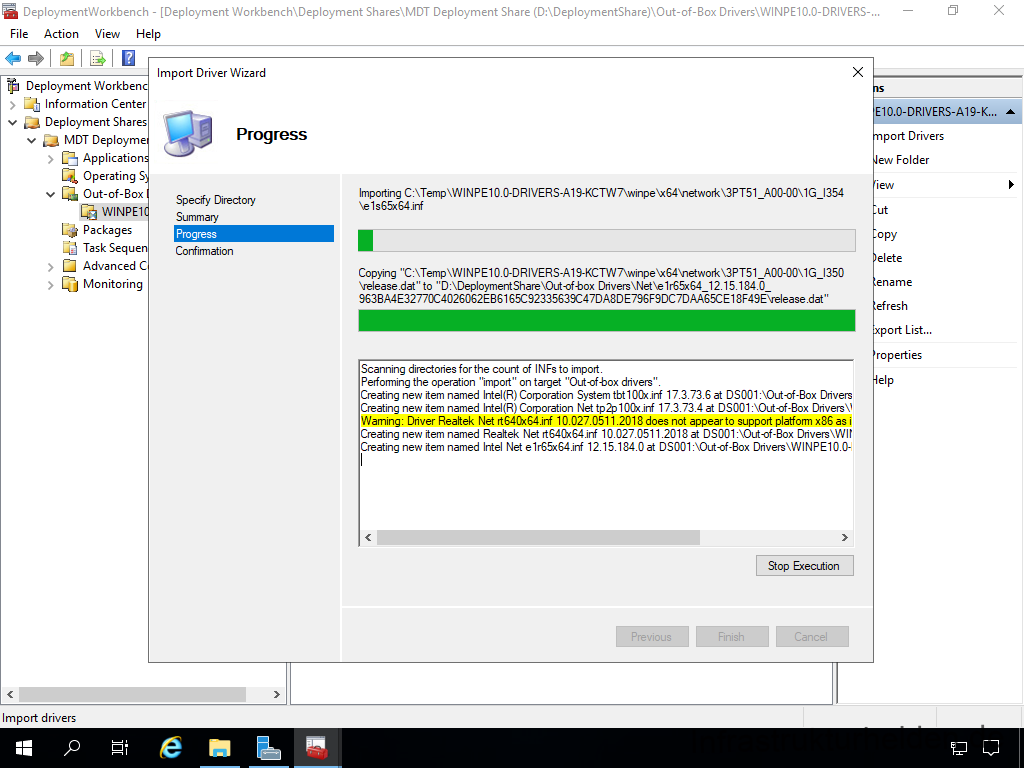
The results are displayed. This also contains warnings and possibly errors. In this case, the warnings can be ignored.

Thus, the driver pack for the PE drivers is imported into the MDT.
You can import other driver packages in the same way as the PE drivers, there is no distinction here. However, I recommend that you create separate folders for each driver.
Assigning profiles to drivers
In this chapter it does not matter if you are dealing with WinPE or other driver packages. The steps are identical.
The profiles will be needed later for various assignments. First, create a new profile in the “Advanced Configuration” > “Selection Profiles” section with the action “New Selection Profile”. I explain why I go this way when I create the task sequences.
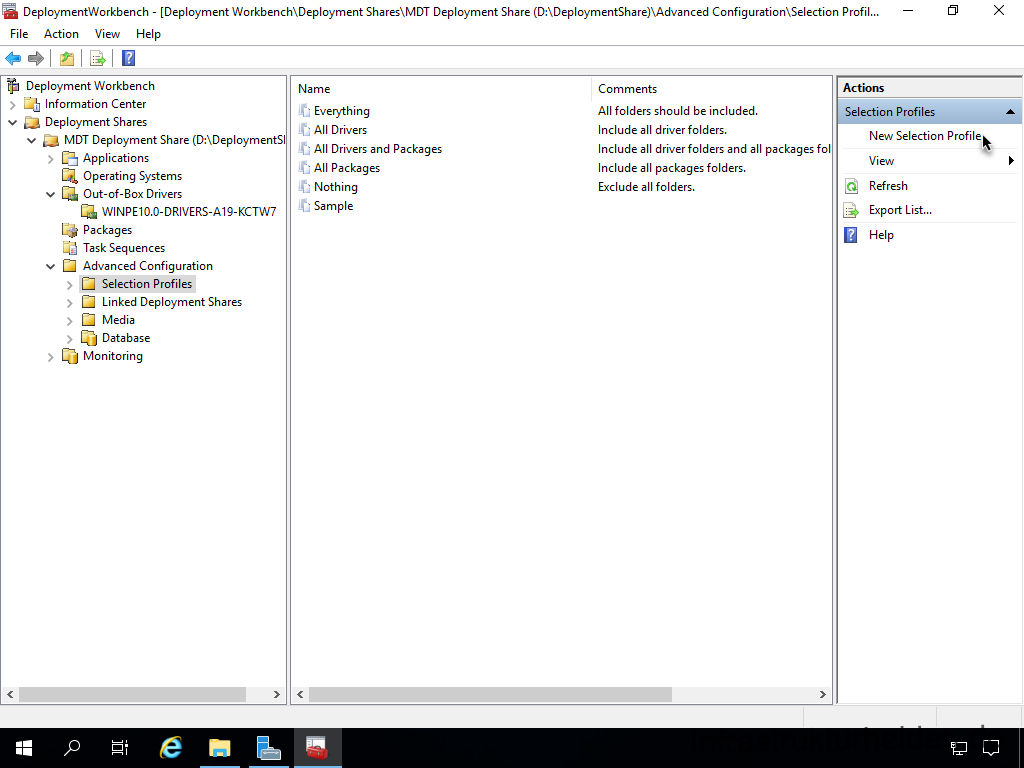
Here I recommend using the exact name of the driver profile.

Select the folder you want to select with the profile.

The obligatory summary follows.

After a short progress dialogue, the result is already displayed
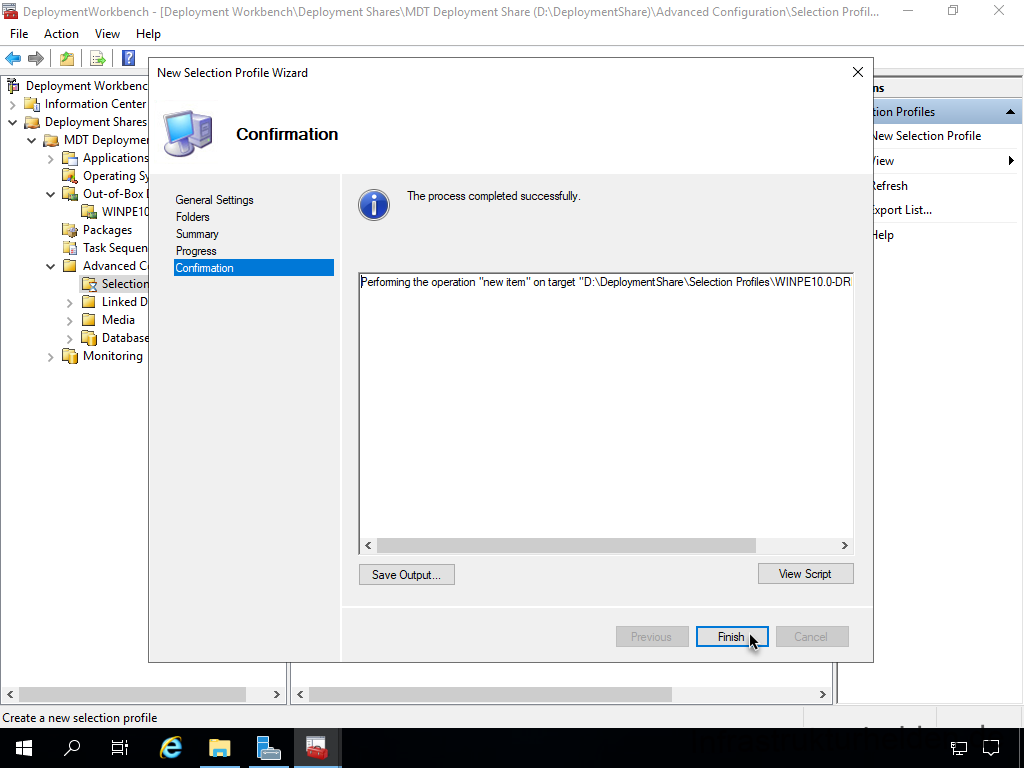
Now the profile is created. You should do this for each driver package.
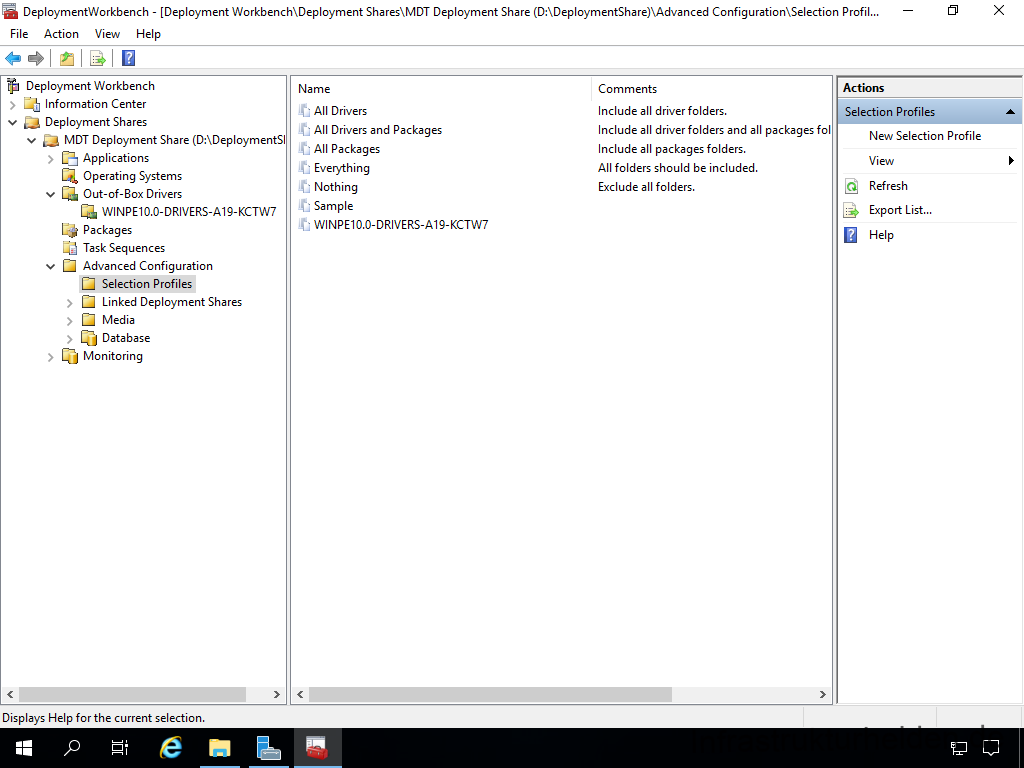
Inserting the Windows Preinstallation Environment (WinPE) drivers into the boot image
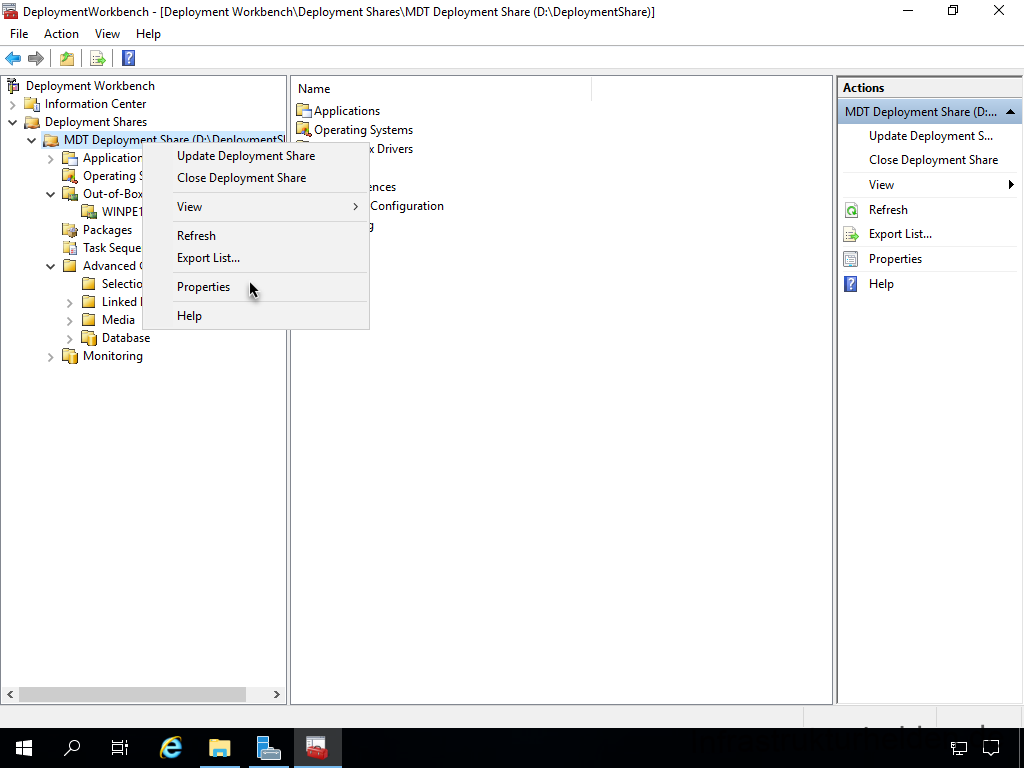
Now the Windows Preinstallation Environment (WinPE) drivers are in the Microsoft Deployment Toolkit (MDT), and now they have to be added to the boot image. To do this, right-click on your deployment share and select “Properties”.
In the “WinPE” tab, select the platform (x86 or x64) you want to customise. Below this you will find another ribbon bar. Here you select the tab “Drivers and Patches”. Under “Selection Profile”, select the WinPE driver profile. Below the profile selection, select the option “Include all drivers from the selection profile”. This is the first place where we use profiles to control the driver selection.
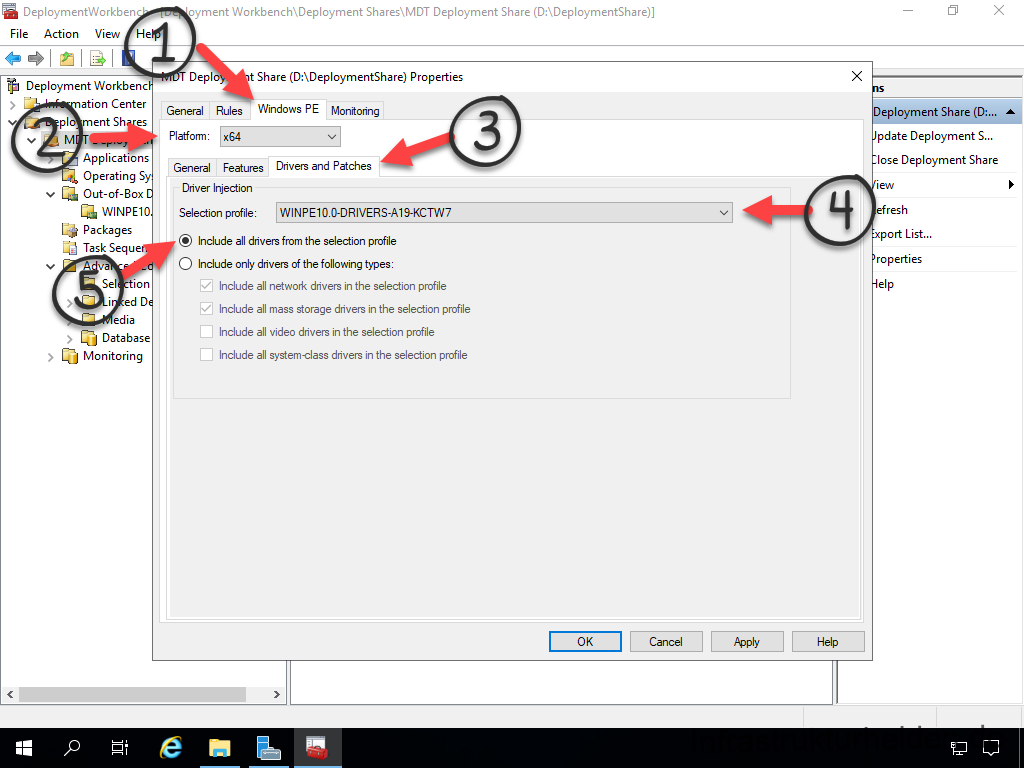
My recommendation: Select “Apply” and change the setting for the other platform directly. That way it is directly correct if you ever need it.
Adding features to the Windows Preinstallation Environment (WinPE)
In addition, we need a few features in the Windows Preinstallation Environment (WinPE) to use the Windows Deployment Server to start the task sequence via PXE later. Not all of these features are necessary for PXE, but have proven to be practical over time. To do this, select the WinPE tab and choose the following features:
- .Net Framework
- Enhanced Storage
- Microsoft Data Access Components (MDAC/ADO) support
- Secure Boot Cmdlets
- Storage Management Cmdlets
- Windows PowerShell
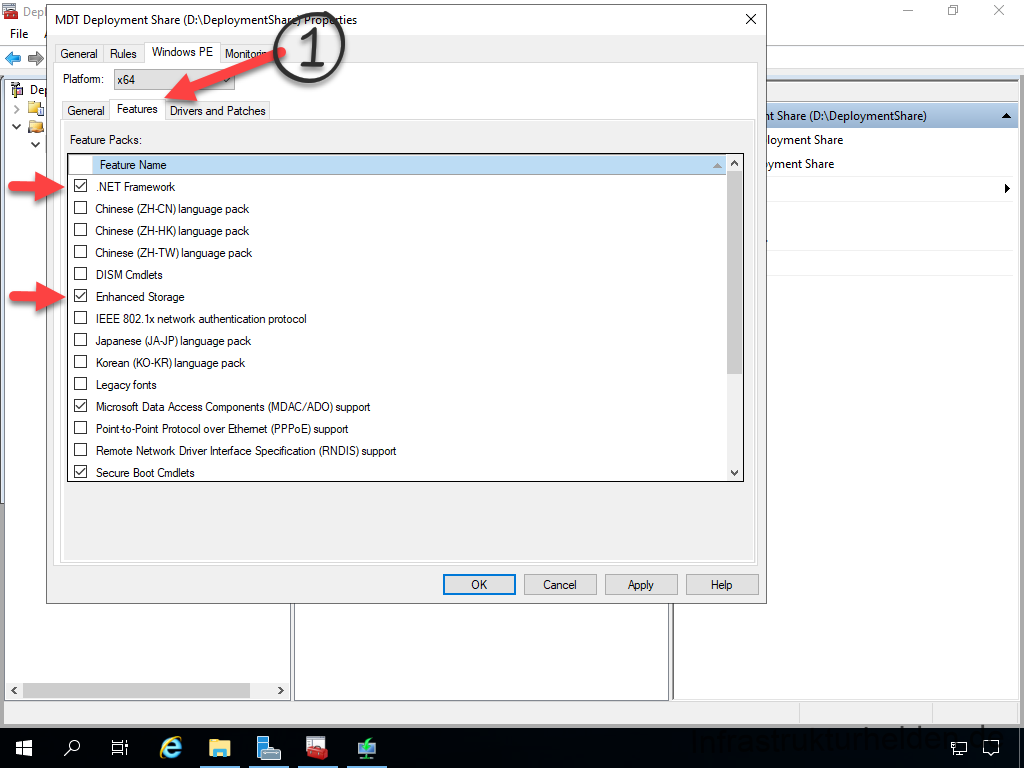
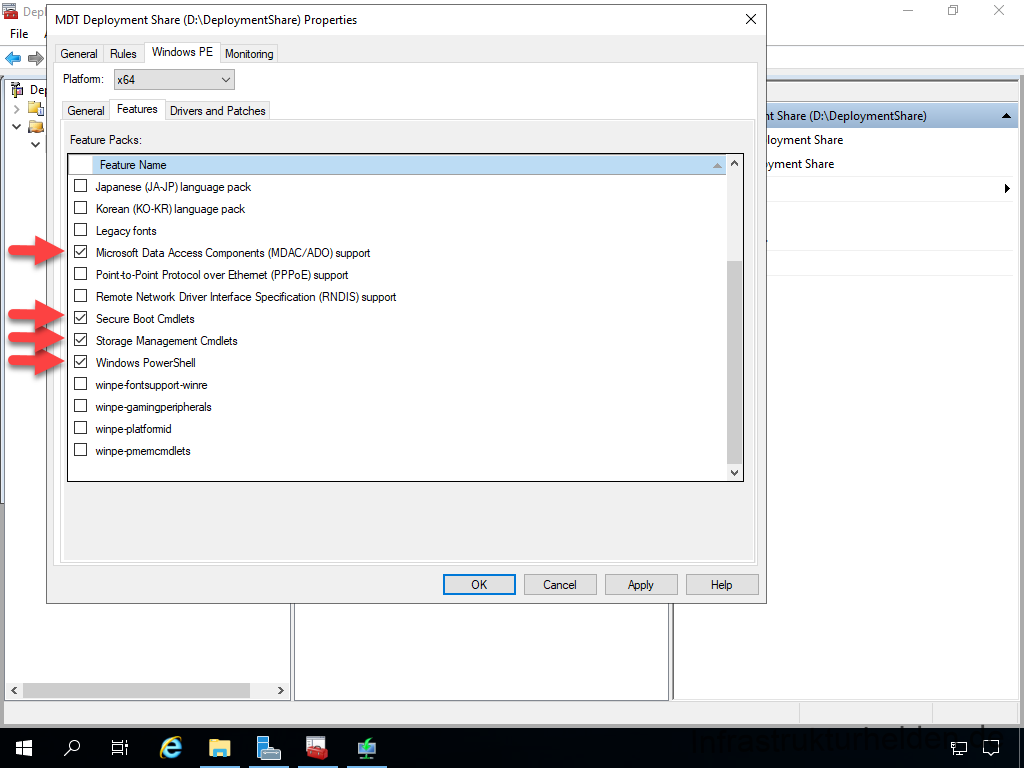
Then close the dialogue box with “OK”.
If you are wondering why this happened so quickly, the drivers and the features are not yet integrated. This step will be done later when we update the MDT Deployment Share when it is ready.
Packaging software
In order for us to be able to distribute software later on during the installation, we need to create some packages. This is done in the “Applications” section. So that it does not become too confusing, I recommend using folders.
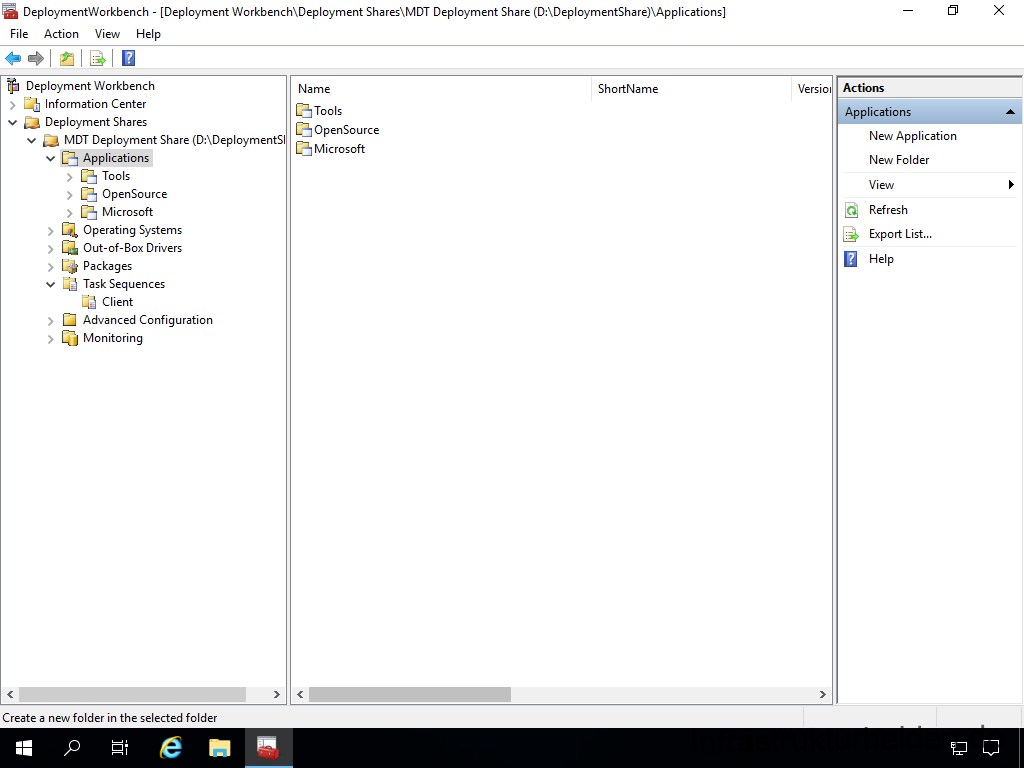
Packaging MSI-based applications
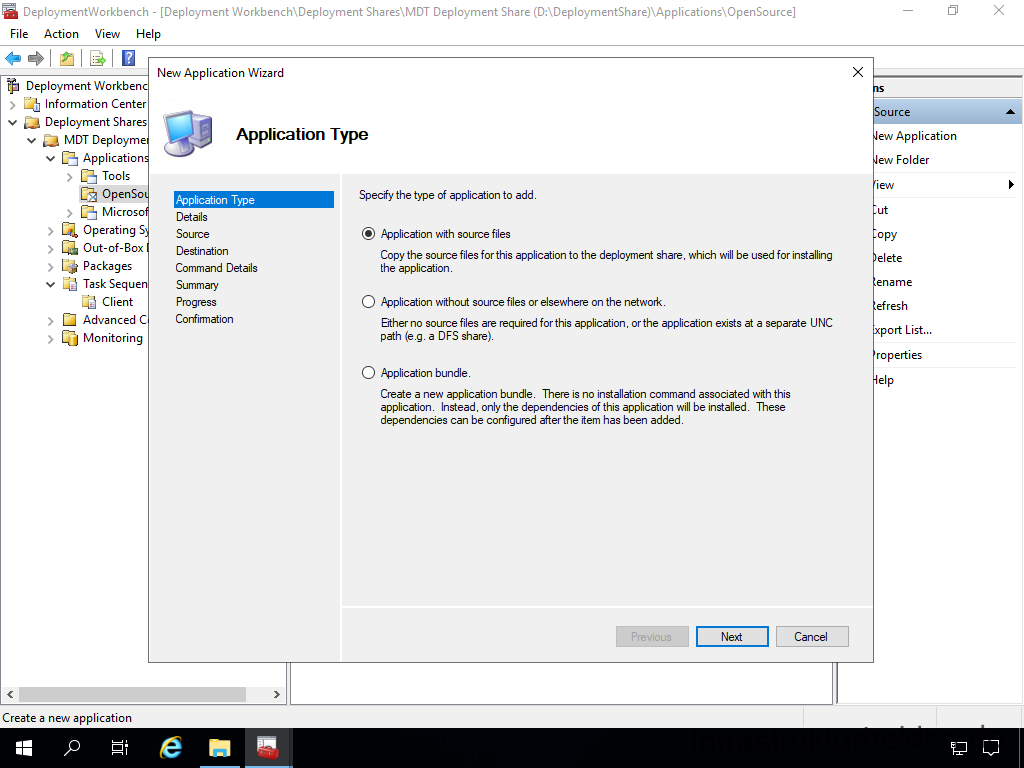
First we start with 7zip.org. To do this, start the “New Application” wizard and select “Application with source file”.
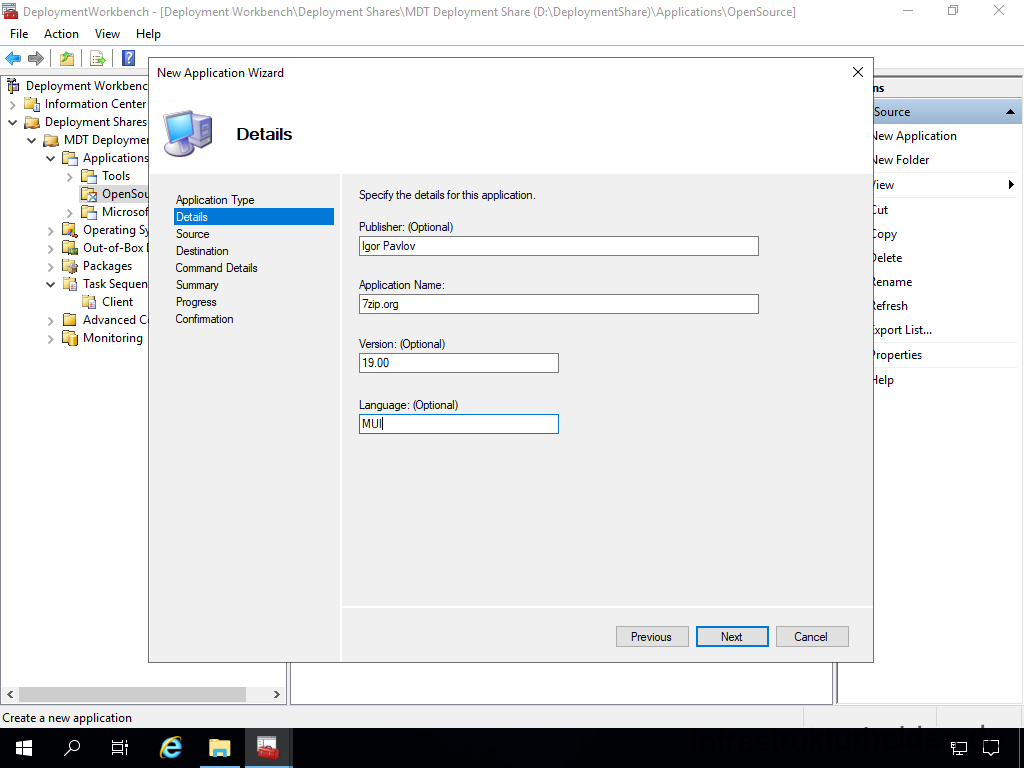
Fill in the application details.
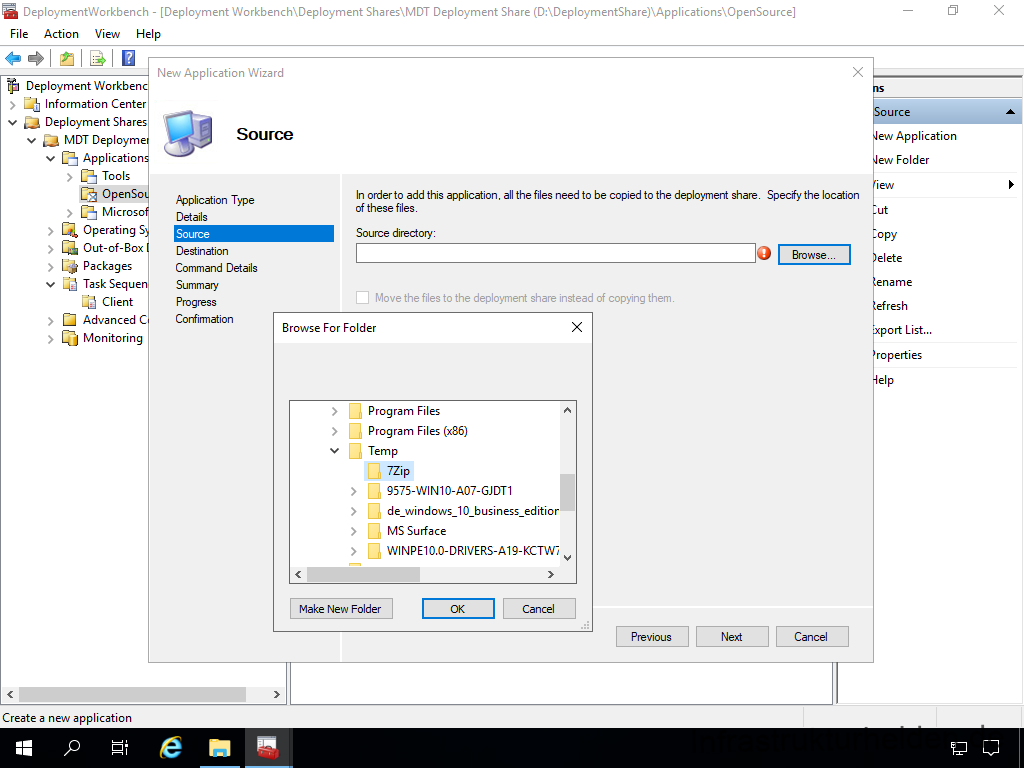
The next step is to define the source. The Microsoft Deployment Toolkit (MDT) copies all files in the specified folder! So make a separate folder for each application. Or use your existing software installation folder. If you use a local folder, you can also move the files.
Name the application appropriately. This name is also displayed in the task sequence. This is why some administrators like to put an “Install. – ” in front of the actual name. This is up to you.
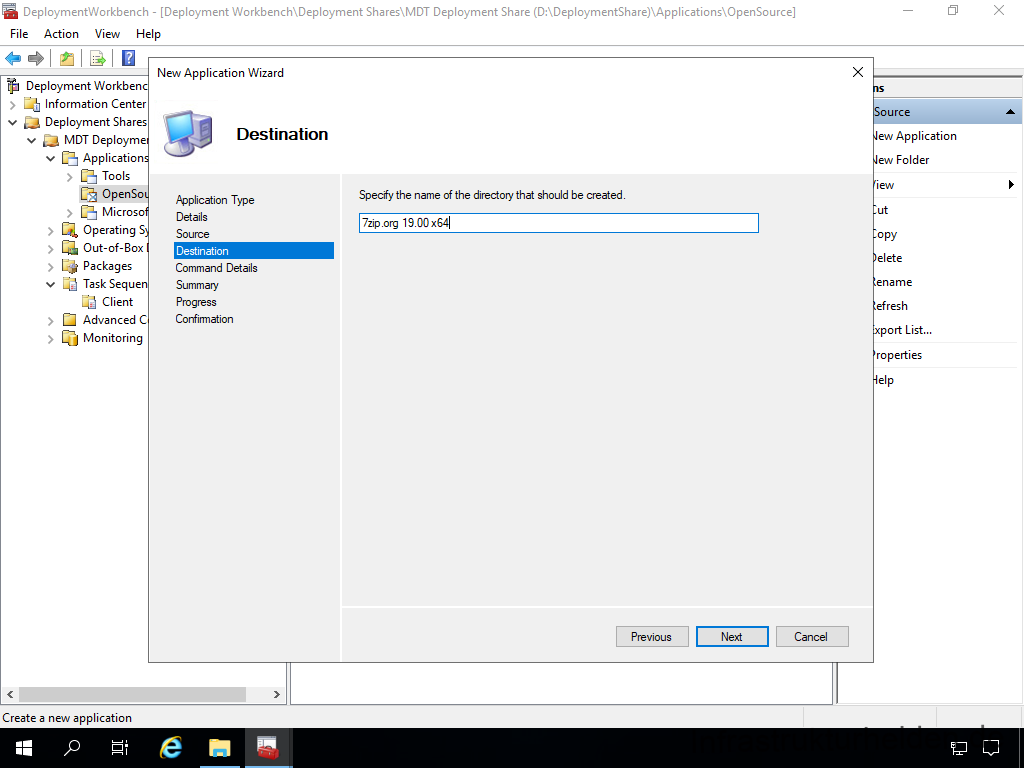
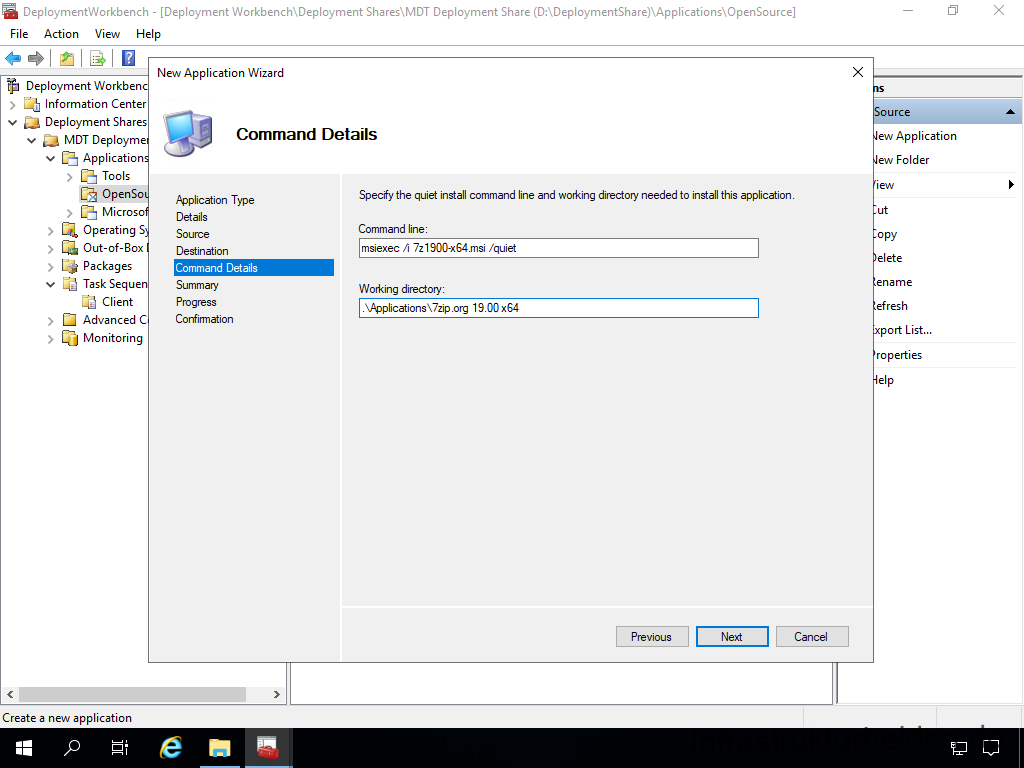
Since it is an MSI package, the command line for installation is very simple: “msiexec /i 7z1900-x64.msi /quiet”
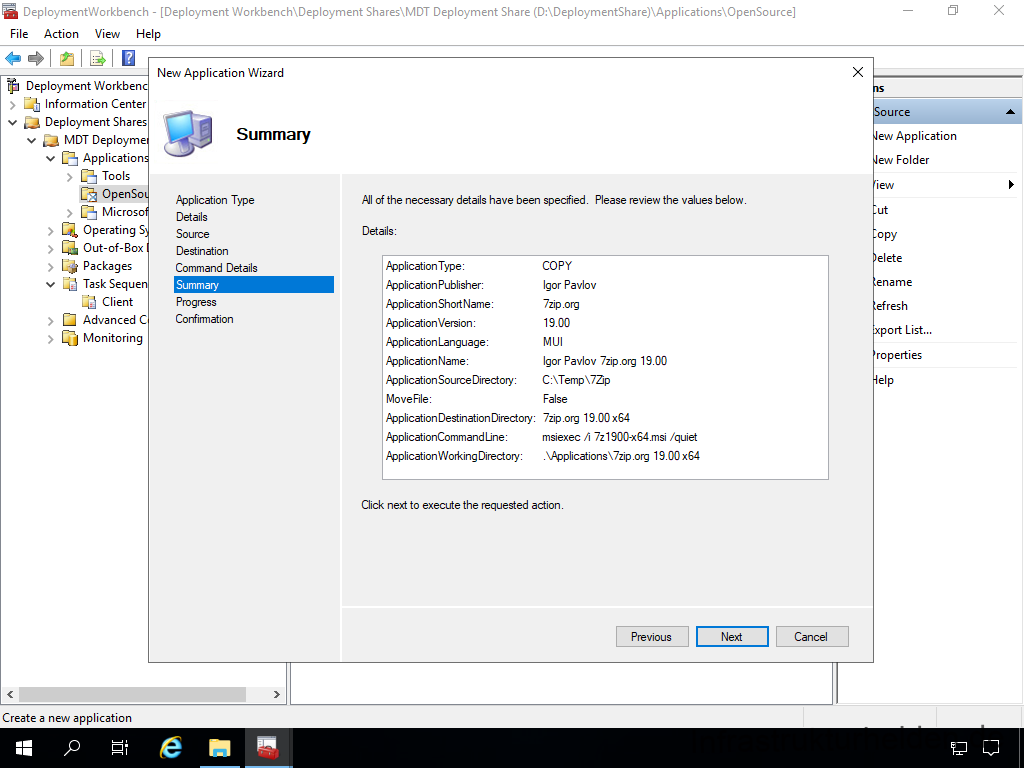
Here is the summary again
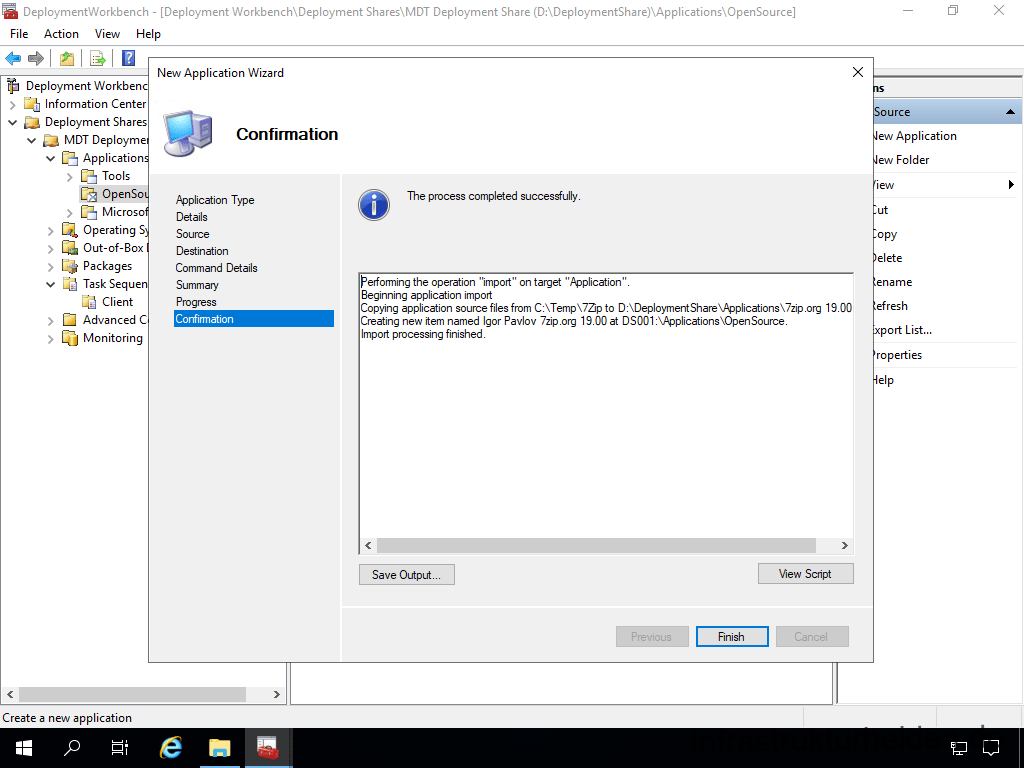
In this case, the actual progress is so fast that we jump directly to the final page.
Packaging other software
In principle, this also works with other software that does not rely on MSI packages. In this case, you only need to create a CMD file as a wrapper. Simply put, an “Install.cmd” with the necessary commands. The command line is then simply “Install.cmd”.
I have described how such a wrapper can look in various articles:
- Microsoft Local Administrator Password Service (LAPS)
- Microsoft Office 2019 / 2016 (click-to-run), Microsoft 365 Apps, Microsoft Project 2019, Microsoft Visio 2019
- Microsoft Visual Studio Runtimes
- Microsoft Azure Log Analytics Agent
- Adobe Acrobat Reader
- Google Chrome
- Synology Active Backup for Business Agent
- Mozilla Firefox
- GPG4Win
- Notepad++
- FileZilla
Find in the article “Unattended installation of software“.
- Microsoft Teams
- Microsoft Image Composite Editor
- KeePass
- Greenshot
- PDF24.org
- Cinspiration RDP Manager
- Leawo Blu-ray Player
- CDburnerXP
Find in the article “Unattended installation of software – second help“
If you don’t want to work with installation wrappers and scripts, but also don’t want to create MSI packages, I recommend you take a look at MSI-X. You can find instructions on how the new package format works in the article “Packaging business applications with MSI-X“.
Another limitation is that you cannot easily distribute applications from the Microsoft Store or Microsoft Store 4 Business with the MDT. This can only work if the developer of the application provides you with the APPX package for a so-called “sideloading”. If you are familiar with the control of the Microsoft Store
Considerations on Base Image / Golden Image
There are two approaches to operating system installations with MDT:
- Installation based on a Microsoft image (e.g. images from the Software Volume Licence Portal or an RTM version)
- Installation on the basis of a self-maintained image
What are the differences in the methods? Let’s take a look at the steps:
Deployment without base image
Here, each step is required for each computer. This means that, especially with Windows updates, it can take a while.
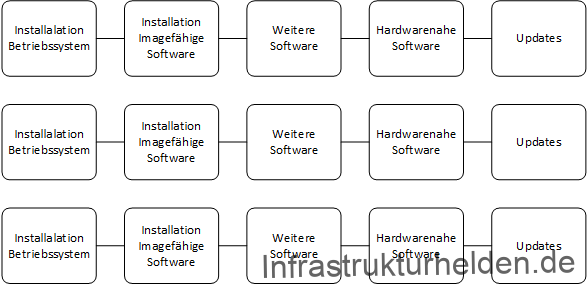
With the cumulative updates under Windows 10, this has already improved, but not yet optimally. The cumulative updates also have prerequisites or require restarts before further updates can be installed.
Deployment with Base Image / Golden Image
Here, as many steps as possible are transferred to the base image. This means that suitable software that everyone needs can already be installed in the base image. The creation of the base image takes as long as the individual steps that are moved into the base image. In addition, after the image has been captured, it has to be tested and integrated.
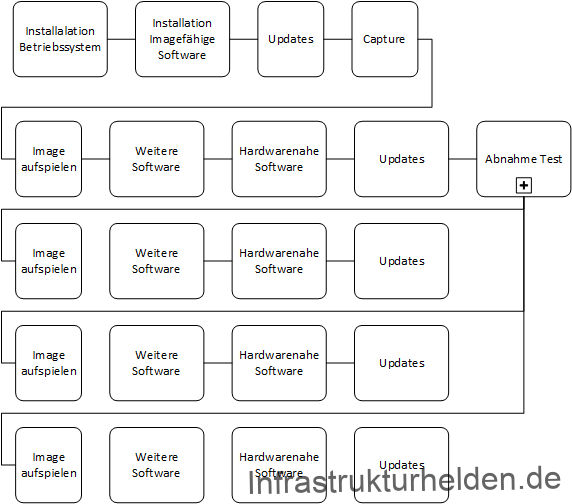
A base image or golden image is a little more complex in the internal process. But when it comes to multiple devices, it can save a lot of deployment time. The boxes do not reflect a time scale, as the time scale depends on the software and is therefore specific to each customer.
Limitations of base or golden images
There are also limitations to a base image:
- No driver software
- No software with driver components, for example:
- PDF printer
- Screen recorder
- Some remote management tools
- No software installed in the user profile
Besides updates, I always use Golden Images to install basics, runtimes, roles and features. Here are a few of my favourites and the reasoning behind why it comes in Golden Image:
- Feature .Net 3.5: Maintained as a feature via the OS, no re-packaging required
- C++ Runtimes (All needed for x86 and x64): Updates are done via Microsoft Update, no repackaging required, if you know which one you need, install only that one
- 7zip.org: Few new updates
- BGInfo: Low release cycle
What does this software have in common? Either it is updated via Microsoft Update or it is updated infrequently. This means that the Golden Image does not need to be updated so often, once a month after Microsoft Patchday is enough.
Methods for self-maintained images
Basically, there are 2 ways to create images.
The first is to modify a WIM file, which is the “Windows Image Media” format, a kind of container from Microsoft. The WIM file is mounted and the updates or software are inserted. I have described how this works in the article “Updating, maintaining and using Windows Image Files (WIM)“. However, this method also has weaknesses: not all updates or software can be installed in this way. Also, the dependencies and sequence do not always fit or work properly. So I don’t use this method any more, but work with the next method.
The other method is to use a capture image. This means that a proper installation takes place and at the end it is recorded and processed. During this processing, the drivers have to be removed and the security identifier (SID) is deleted. This is important because the SID may only be assigned once per domain. This is especially important because services such as KMS use the SID, and Microsoft support may also refuse support for duplicate SIDs.
This image will also end up being a WIM file. I always use this method and have my own task sequence and VM (Pro Windows Release) for it. More about this later in the appropriate chapter.
Which method is the right one for you, Golden Image or not, you have to evaluate for yourself.
Continue with the article “Network installation with the Microsoft Deployment Toolkit – Part 3: Creating task sequences”
Tool Tip (advertising, but from the heart)
I always use Techsmith Snagit€ for my screenshots, and I wouldn’t want to miss it. Whether it’s blurring, arrows, inserting text or cropping, everything I need is possible with it.
You can try it for free at the link. If you like it, you can support this project by buying it via the link. You will not incur any additional costs when buying Snagit (affiliate link).

This looks like one of the best tutorials out there on MDT. I found Part 1 of this series in English on infrastructureheroes.org, but it appears the remaining parts are only available in German. I am able to make these work using Google Translate and the diagrams, but the following diagrams are not available:
MDT Deployment Workbench – Importieren der Treibern – Confirmation
https://www.infrastrukturhelden.de/wp-content/uploads/2020/10/deploymentwcrkbench-deployment-workbench-depicy-23.png
MDT Depolyment Workbench – Profilzuweisung – New Selection Profile – General Settings
https://www.infrastrukturhelden.de/wp-content/uploads/2020/10/deploymentwcrkbench-deployment-workbench-depicy-26.png
MDT Depolyment Workbench – Profilzuweisung – New Selection Profile – Folders
https://www.infrastrukturhelden.de/wp-content/uploads/2020/10/deploymentwcrkbench-deployment-workbench-depicy-28.png
MDT Depolyment Workbench – Profilzuweisung – New Selection Profile – Summary
https://www.infrastrukturhelden.de/wp-content/uploads/2020/10/deploymentwcrkbench-deployment-workbench-depicy-30.png
Would it be possible to correct this problem?
Thanks.
Hi Thanks for the comment. I will work on the translations and check why the images are missing.
Her comes part 2 as a translation. I still searching the missing images. Sorry.