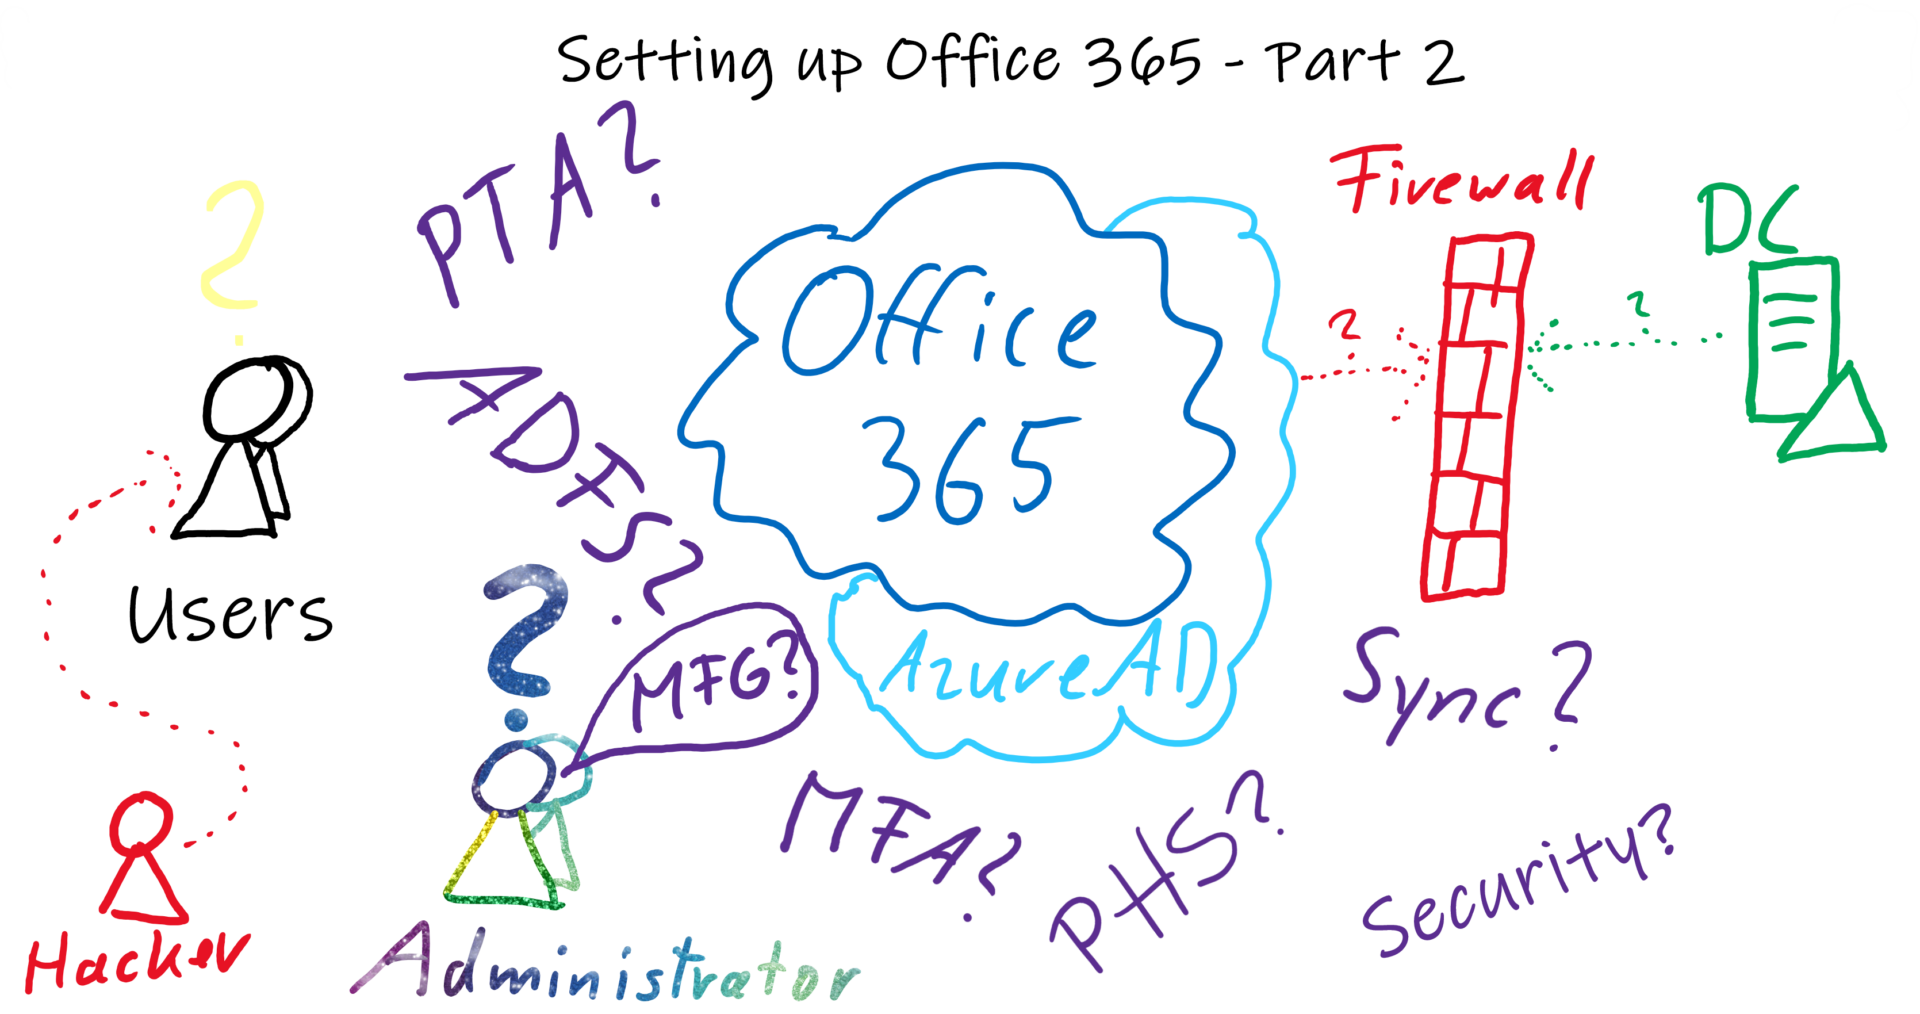
This article is part of my migration from my old Office 365 to my new Microsoft 365 Tenant. It is also about setting up Office 365, the other Microsoft 365 topics will follow later. I also have written this article intentionally so that it can also be used for setup outside of a migration scenario. Part 1 was about choosing the right edition, setting up the account and configuring the domains and DNS.
Setting up Azure AD synchronization and authentication
In order not to maintain everything multiple times and to avoid having to deal with different accounts for the users, there is no way around a synchronization with the Active Directory. If you have not yet dealt with Azure AD, I recommend a look at the article “Microsoft Azure AD – what is it for?”
There are different ways to synchronize. You have the choice between full and limited synchronization. Limited means, for example, that only a specific organizational unit or members of a specific group are synchronized. It is also possible to restrict the synchronized attributes. Of course, this increases the complexity if you need to analyze in case of errors. I always recommend full synchronization for most customers.
There are different approaches for authentication:
Password Hash Authentication / Synchronization (PHS)
During password hash synchronization, a hash of the password is stored in AzureAD. This allows the password to be checked. From a technical point of view, this is not the same hash as that stored in the Active Directory. It is therefore also not possible, should you be able to steal this hash, to abuse it in on-premise AD. You can find out exactly how this is secured in the individual steps. The big advantage of this procedure is that authentication is done on Azure AD. This means a connection to your environment is not necessary. Even if an excavator has disconnected the computer centre from the internet, your employees can still log on to Office 365 / Azure AD at the nearest café using WiFi.
But what exactly is the procedure:
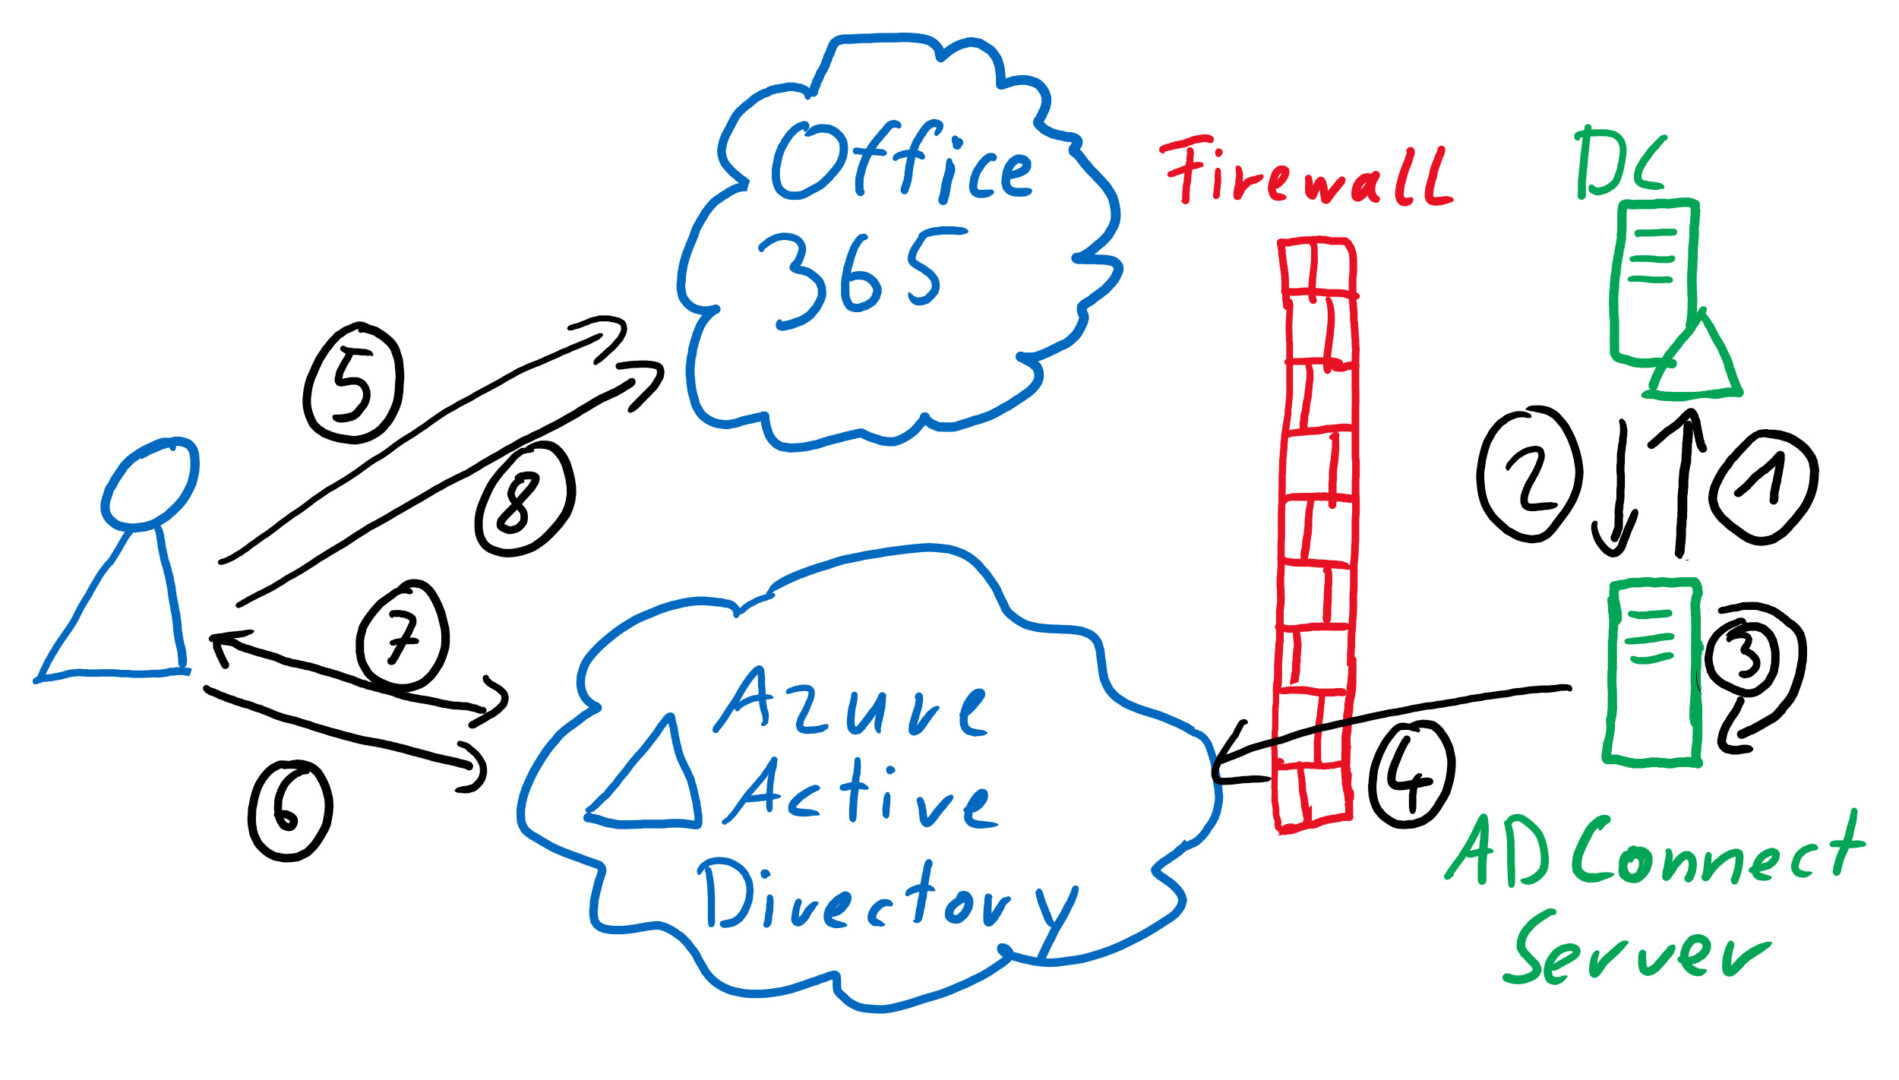
- Before a user logs in, the synchronization of the objects already starts. The AD Connect server asks the domain controller for the password via a special interface
- The domain controller transmits the password as MD4 Hash
- The Azure AD Connect Server encrypts the MD4 hash with MD5. The 8-byte binary hash is converted into a 64-byte binary hash. Then hardened with a user-specific 10-byte salt. Then the whole thing is converted to SHA256.
- The SHA256 for the user is transmitted and stored in Azure AD.
- The user accesses a resource, for example, Office 365, and if the user is not logged on, he or she is redirected to the AzureAD login page to log on.
- The user logs on to Azure AD with his or her user ID.
- The AzureAD recognizes PHS and requests the entry of the password. AzureAD forms a corresponding hash and compares it with the stored hash. If the hash matches, an Azure authentication token is issued.
- The user logs on to Office 365 with this token.
Due to the procedure and the various hashes of the password it should not be possible to decrypt it.
I prefer this method if there are no very good reasons for one of the other methods. For instructions on how to set up PHS, see the article “Azure Active Directory with Single-Sign-On with Password Hash Synchronization“. PHS can also be set up as a fallback solution for the other two. So that login without connection between the own authentification servers and the Azure Active Directory is possible.
Pass-Through authentication (PTA)
Pass-Through authentication requires an additional service at your data center. This service retrieves the encrypted credentials from a queue at AzureAD and checks them against your own domain controller. The advantage is that the hashes of the password hash are not stored in Azure AD. The disadvantage, if the Internet connection to your data center is down, no one is able to log on. This solution therefore requires certain redundancies and preparations. You can also transfer the hashes of the password hashes and switch to password hash authentication in an emergency.
How does it work?
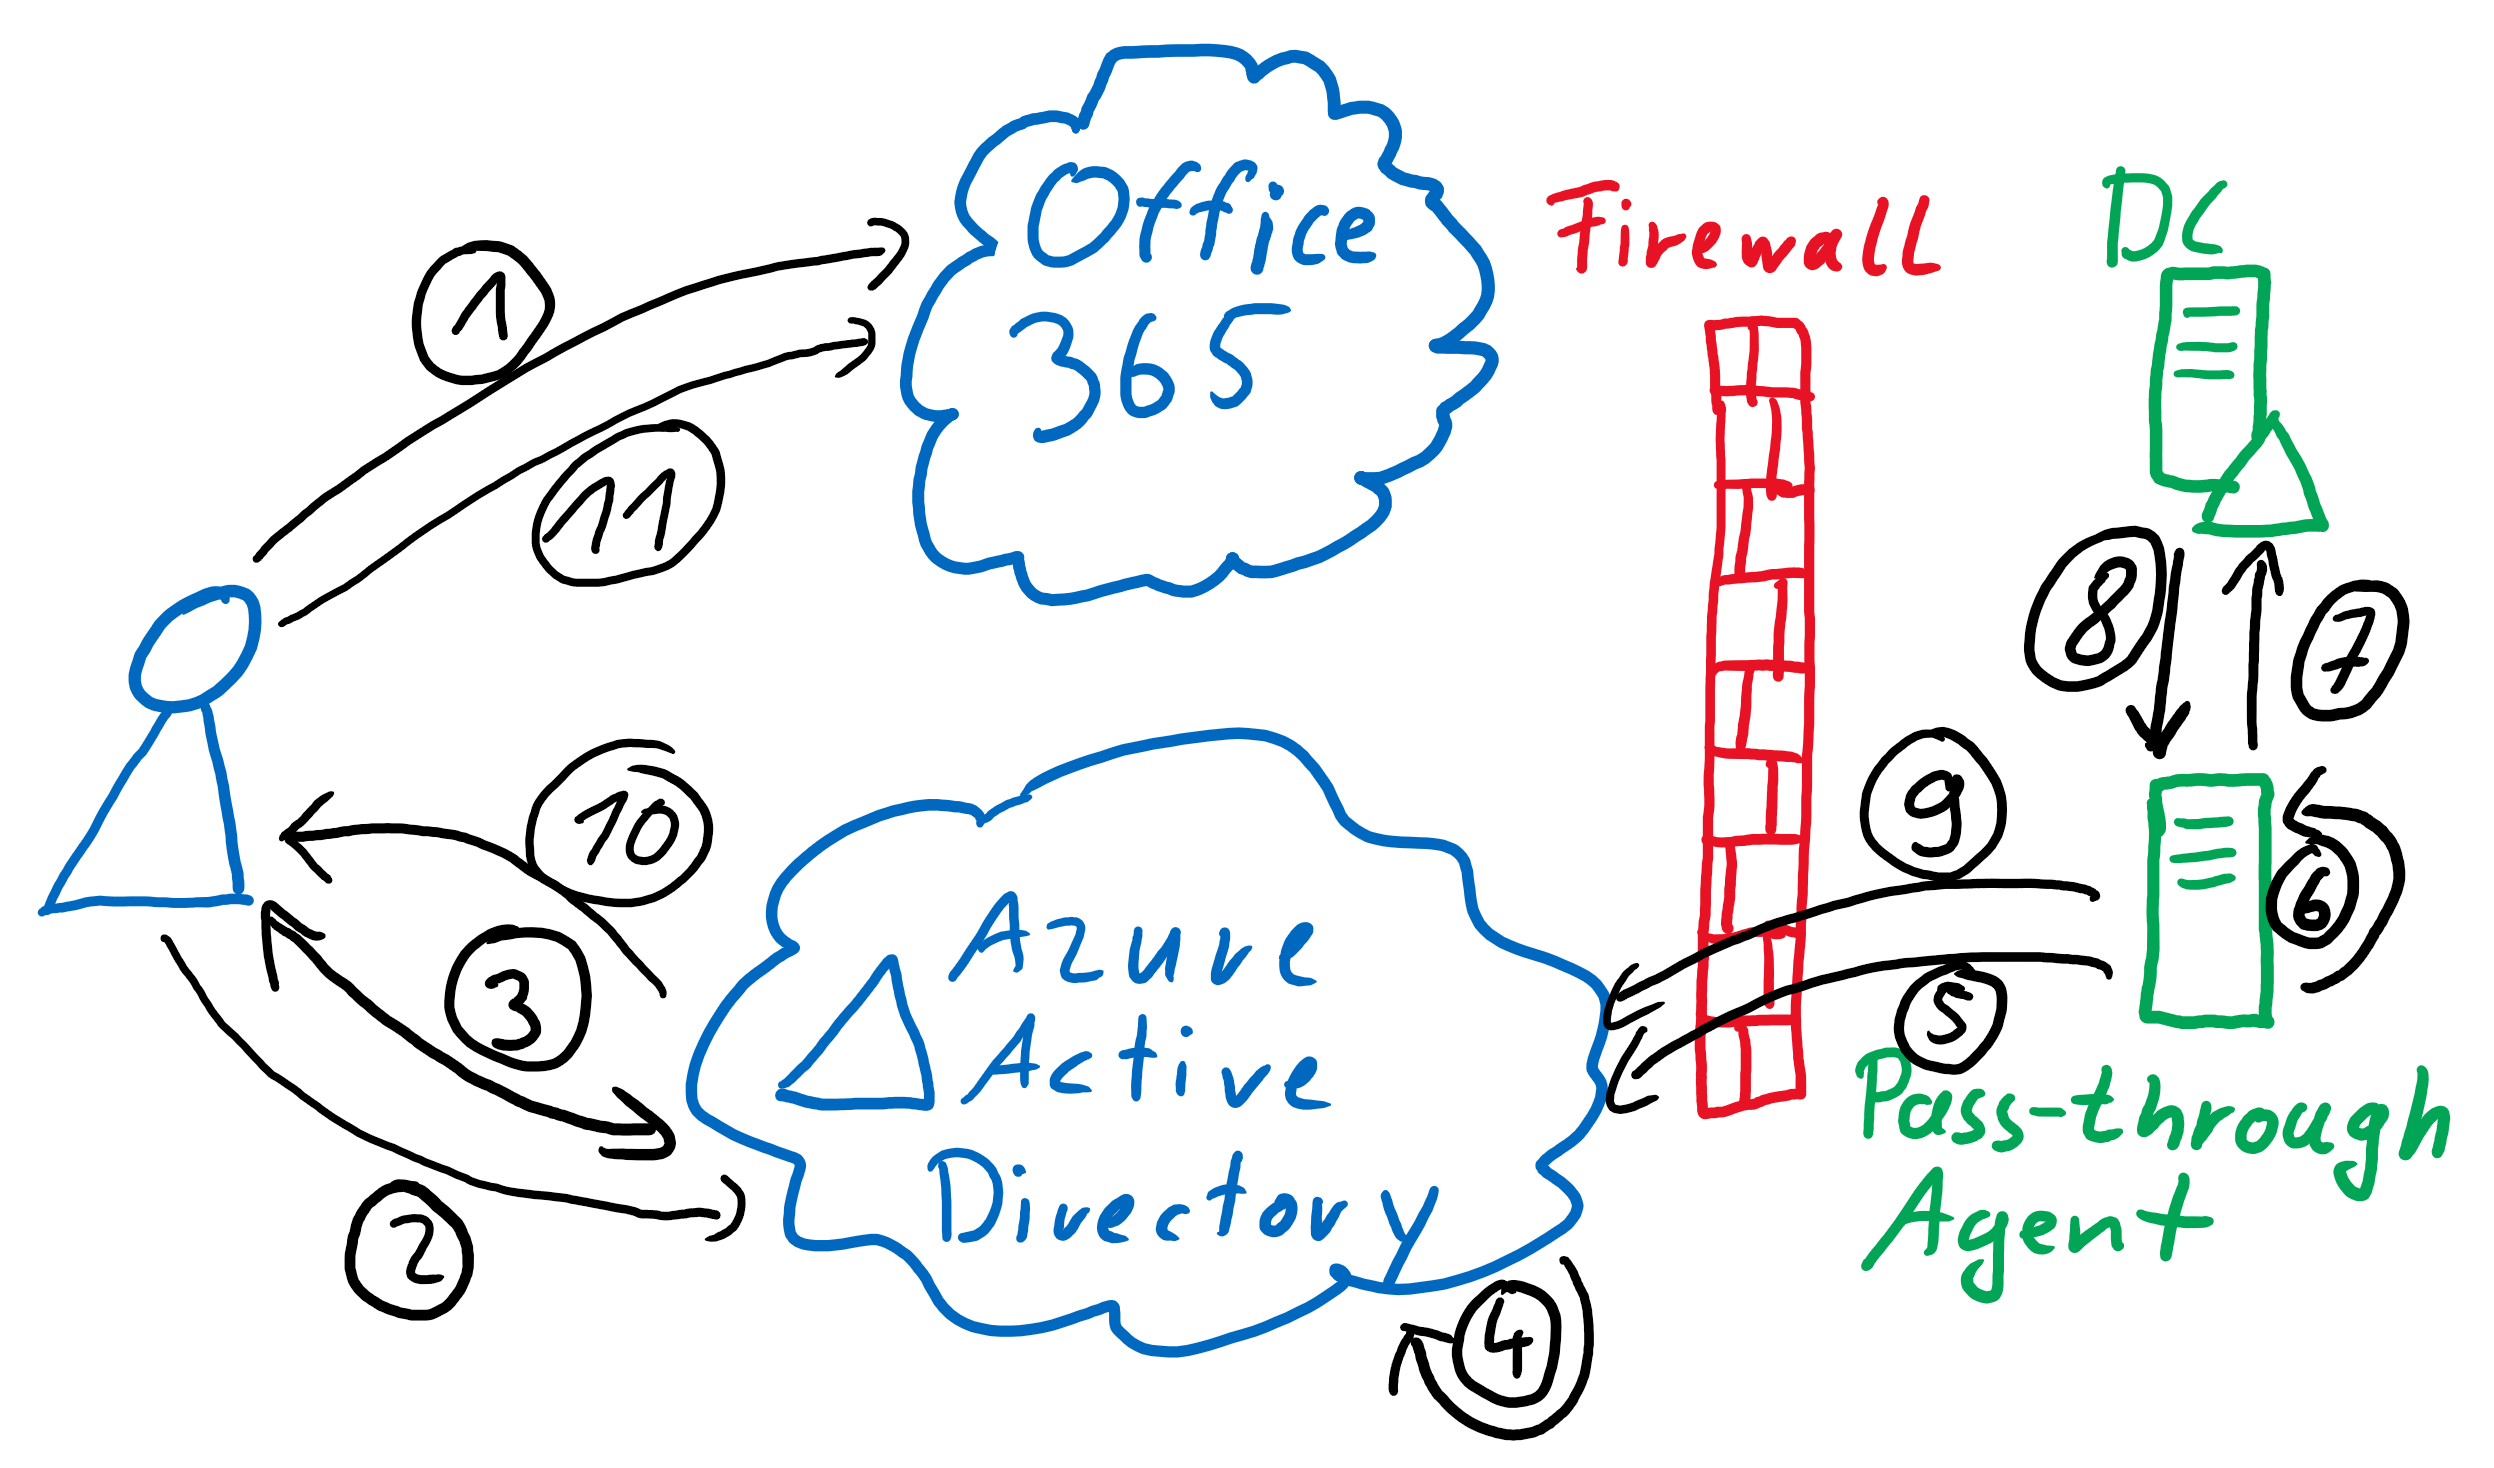
- The user accesses a resource, for example Office 365, and if the user is not logged in, he or it is redirected to the AzureAD login page to log in.
- The user logs on to Azure AD with his or her user ID.
- The AzureAD recognizes PTA and prompts for the password.
- The AzureAD encrypts the information with the public key of the pass-through agent and places it in the queue.
- The Pass-Through Agent fetches the packets from the queue (there is a permanent connection that notifies it when there is something new)
- The PT-Authentication Agent Agent decrypts the packet with its private key
- The decrypted data is sent to the domain controller for verification
- The domain controller responds accordingly (successful, failed, user locked or password expired)
- The PT authentication agent forwards the response to the Azure Active Directory
- The Azure Active Directory issues an authentication token
- The user logs on to Office 365 with this token.
Due to the kept open connection that is established by PTA agents, there is no noticeable delay with this method. Since the PTA agent establishes the connection, no adjustments or forwarding to your firewall are necessary. The Azure AD Connect Server is also required for this solution, it is just not involved in the authentication process, but must replicate the users and the appropriate attributes.
Active Directory Federation Service
Active Directory Federation Service, AD-FS in abbreviated form, is the foundation of the Azure AD authentication. It was the first login method that allowed for uniform login with on-premise credentials to the cloud.
Since my article from 2013 “What are Microsoft Active Directory Federation Services (ADFS)”, published in German at the CONET Blog (I was working there at the time) is a bit outdated, I explain it here again.
A special feature of this solution is that it requires an incoming activation into the DMZ and from the DMZ into the internal infrastructure. This may sound like a security problem at first sight, but using AD-FS for this purpose is the solution I can best adapt to my security needs. It is also the most secure solution insofar as no Password is entered at AzureAD but instead is directly redirected to the server of the own company. This makes it the most secure solution if you do not want to entrust Microsoft with the authentication.
But AD-FS has other advantages as well, e.g. third-party solutions for multi-factor authentication such as RSA can also be integrated. Also, I can control very granularly which authentications and factors are required. This sounds like the feature “Conditional Access”, which was also designed with one or the other view on ADFS. The idea was to provide the same security possibilities for other authentication types with much less effort. Further advantages of AD-FS are that I can connect much more services than Azure AD because AD-FS speaks and converts SAML, OAUTH and WS-Fed.
Where there is so much light, there has to be a shadow. The AD-FS needs more servers and is much more complex in setup and maintenance. Similar to push through authentication, logging on to resources is not possible without access to your own environment. I personally recommend ADFS only in very complex environments with special security requirements, or if a non AD directory service as Identity Provider is involved.
How does the login work:
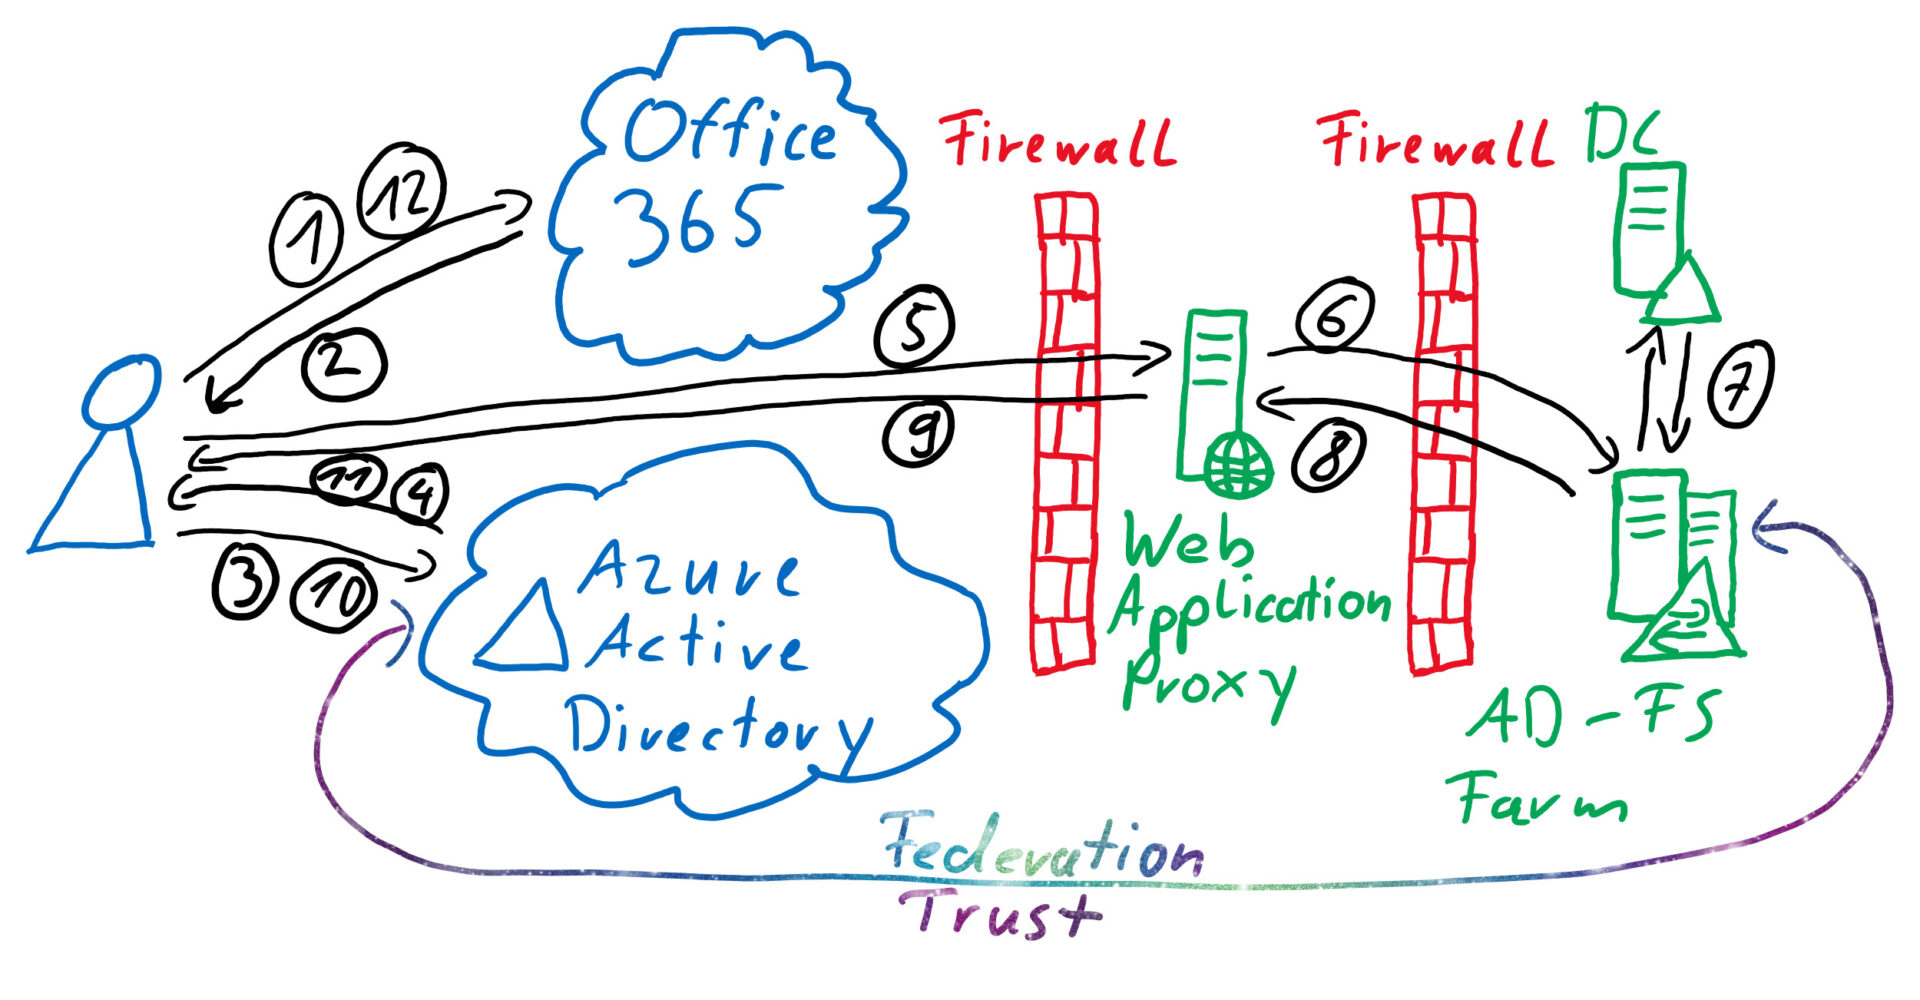
- The user accesses a resource, for example Office 365
- Office365 redirects the user to Azure AD for login.
- If he or she is not logged on, the user is redirected to the AzureAD login page for login. After the user ID is requested, it is recognized that the user is a Federation User.
- Azure AD redirects the user to his Federation Server, in this case a Web application proxy in the DMZ that serves as a reverse proxy.
- The user authenticates himself at the reverse proxy with his password, the user name is bassed on.
- The reverse proxy forwards the request to the AD-FS server or the AD-FS farm.
- The AD-FS authenticates the user at the Active Directory and issues an ADFS token.
- The token is forwarded to the reverse proxy.
- This proxy sends the ADFS token back to the user.
- Now the Azure AD is contacted again and the ADFS token is checked there.
- After a successful verification an Azure AD token is issued.
- The user logs on to Office 365 with the AAD token.
Actually quite simple, isn’t it?… Especially if you consider that the Web Application Proxy is best made up of at least two systems with a load balancer. And the AD-FS should also be a farm.
And yes, you need an Azure AD Connect Server also for this solution, it is just not involved in the authentication, but has to replicate the users and the appropriate attributes.
Azure Active Directory Seamless Single Sign-On (Azure AD Seamless SSO)
This form of Single-Sign-On is only possible with PHS or PTA. For AD-FS there are separate ways. However, since AD-FS is probably too complex for most people, I will not cover this topic here.
For Azure AD Seamless SSO to work, the devices must be members of the AD domain. They do not need to be members of the Azure Active Directory.
What does SSO work with?
The Web pages for Office 365 when you are called with the domain reference. For example:
- https://login.microsoftonline.com/<tenant_ID>/<..>
- https://myapps.microsoft.com/<tenant_ID>
- https://<tenant_id>.sharepoint.com
But only with the following browsers (and this must still be partially prepared by group policy, more later on) on Microsoft Windows 7, Windows 8.1 and Windows 10
- IE 10
- Microsoft Edge (Classic)
- Microsoft Edge (Chromium)
- Google Chrome
- Mozilla Firefox
Under MacOS X it should also work for Google Chrome, Mozilla Firefox, Edge Chromium and Safari with additional effort. Furthermore, the SSO also works with Microsoft Office 365 ProPlus (from 16.0.8730). Only OneDrive requires additional steps, more about this in this Microsoft Blog article.
What must be configured in the group policies?
For this to work the URL “https://autologon.microsoftazuread-sso.com” must be added to the intranet zones. There are different ways to do this, depending on the browser and management strategy.
The Google Chrome follows, if it is configured accordingly, the IE / Edge default.
Microsoft Internet Explorer via Group Policy
When set as Group Policy, users cannot change the setting in the browser. This is very restrictive, but may be the better option depending on security requirements.
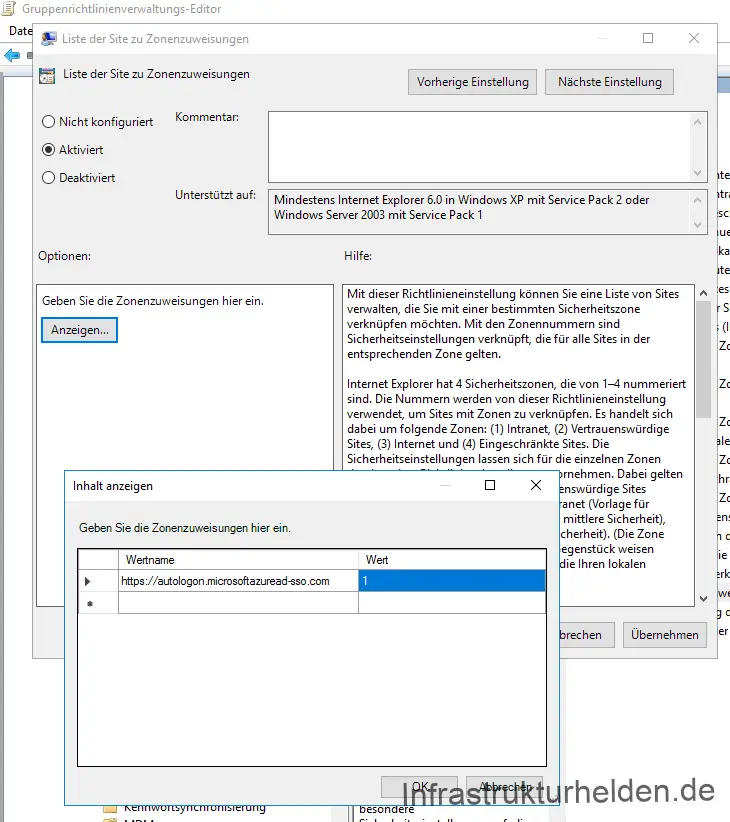
Navigate in Group Policy as follows: User Configuration > Policies > Administrative Templates > Windows Components > Internet Explorer > Internet Control Panel > Security Page and select the setting and select the Site List for Zone Assignment setting.
Enter the URL with the value “1”, this stands for Intranet sites.
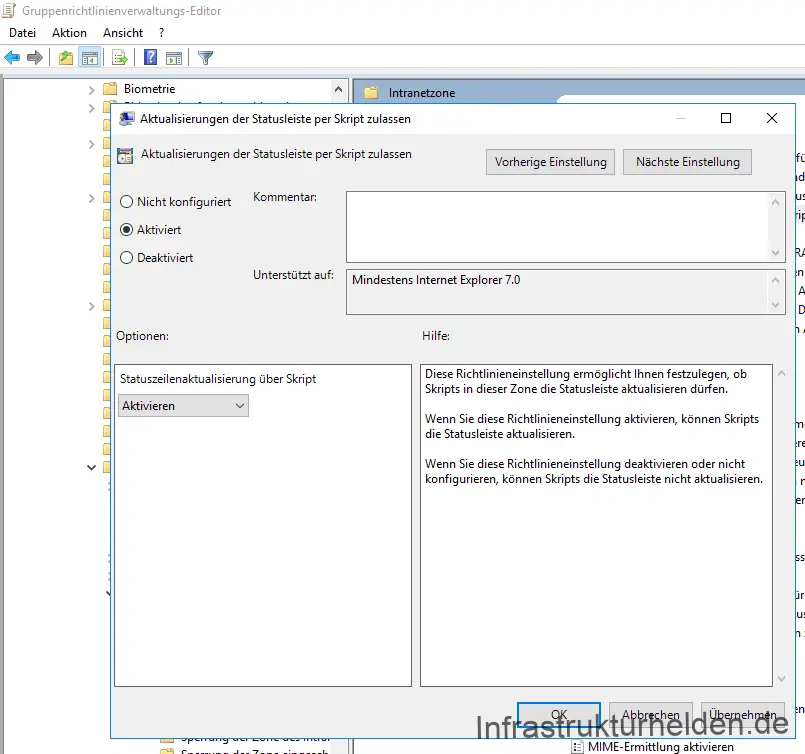
In addition, one more setting is required. This can be found under User Configuration > Policies > Administrative Templates > Windows Components > Internet Explorer > Internet Control Panel > Security Page and select the setting. The setting you need to edit is “Allow status bar update by script”.
This policy must be enabled and the option must also be enabled.
Microsoft Internet Explorer via Group Policy Defaults
If you do not want to restrict the users too much, it is recommended to set Group Policy Preferences. This means that the user can change these settings.
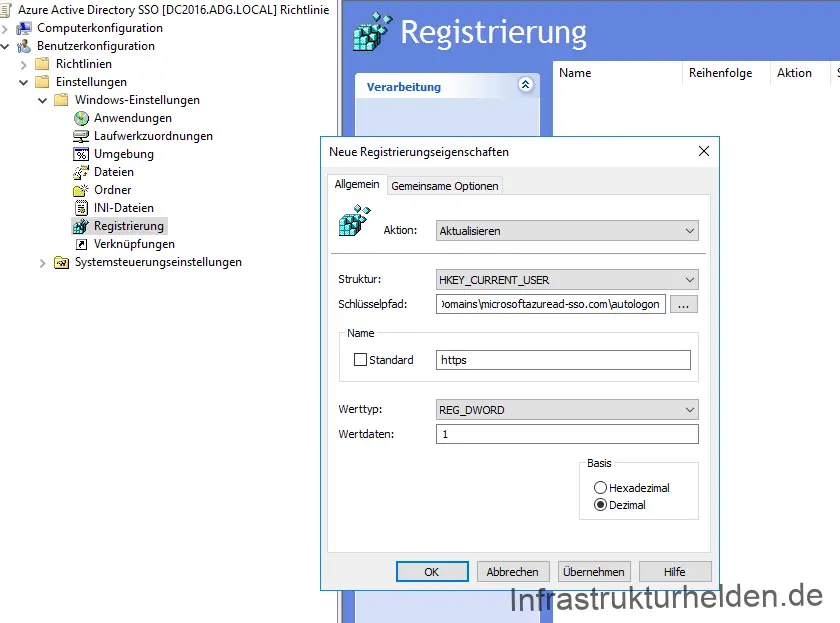
This is realized via a key in the registry. This key can be set under User Configuration > Settings > Windows Settings > Registry. To do this, create a new registry item with the following values:
Key path: Software\Microsoft\Windows\CurrentVersion\Internet Settings\ZoneMap\Domains\microsoftazuread-sso.com\autologon
Name: https
Value type: REG_DWORD
Value data (Dec): 1
Mozilla Firefox
For Mozilla Firefox you can use the Administrative Templates. More about the templates can be found in the article “List of different group policy templates“. The required setting “SPNEGO” can be found under User Configuration > Policies > Administrative Templates > Mozilla > Firefox > Authentication.
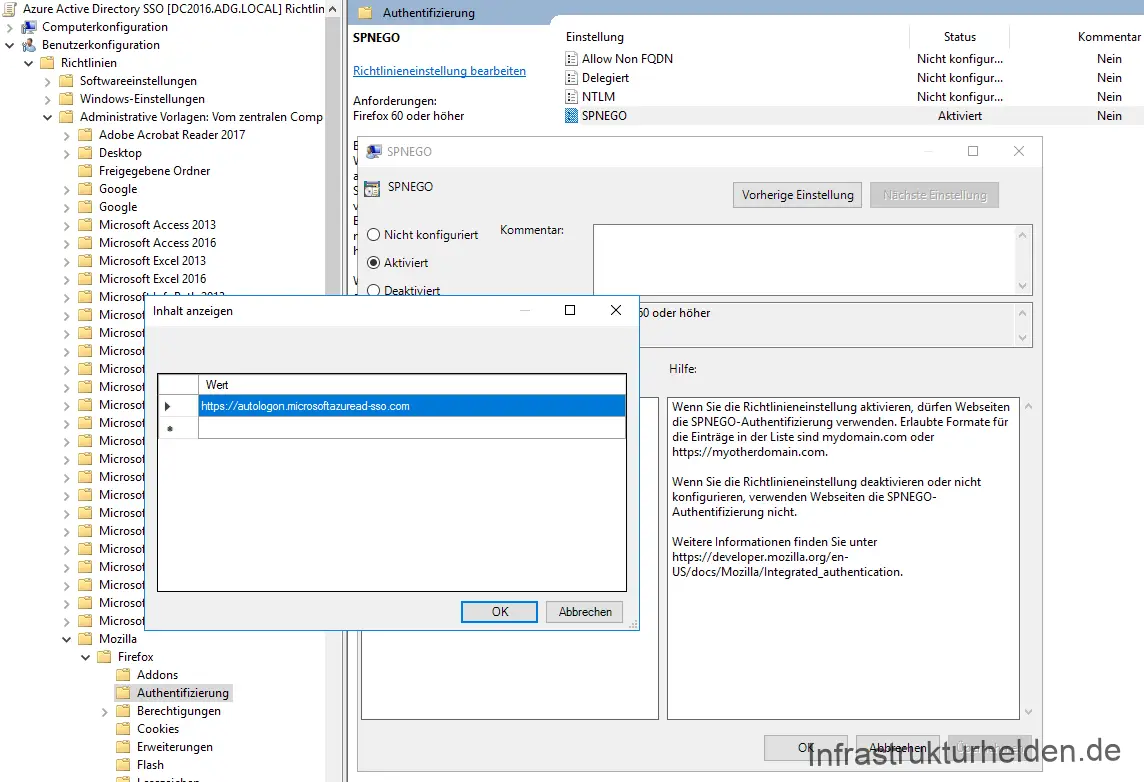
Installation of Azure AD Connect
The installation is very simple and agent supported. You can download the current version from the AzureAD portal. The individual steps are self-explanatory once you know which authentication you want to use. In the article “Azure Active Directory with Single-Sign-On with Password Hash Synchronisation” I will guide you through the individual steps of the installation.
Setup Azure Multi-Factor Authentication (MFA)
Since we’ve talked about authentication before, and AD-FS has mentioned the term multifactor authentication before, let’s take a look at this. As in the previous chapters, I will ignore AD-FS.
The Azure MFA is also one of the prerequisites for conditional access or authentication scenarios such as password less authentication. There are a few things to consider:
- Legacy applications, which should be protected, need the Azure AD Application Proxy or other methods to be integrated. A direct integration or extension into the on-premise AD authentication is not planned.
- Microsoft Office 2010 and Apple Mail for iOS 11 do not support Modern Authentication.
- As the type of authentication changes, users should be included and trained. Microsoft also offers documentation in English for this purpose.
- Azure MFA can also be integrated with Radius and AD-FS. More about this in Microsoft Docs. This allows me to integrate Azure MFA with almost any authentication I can run over an AD. It is only a question of effort and complexity.
Authentication factors with Azure MFA
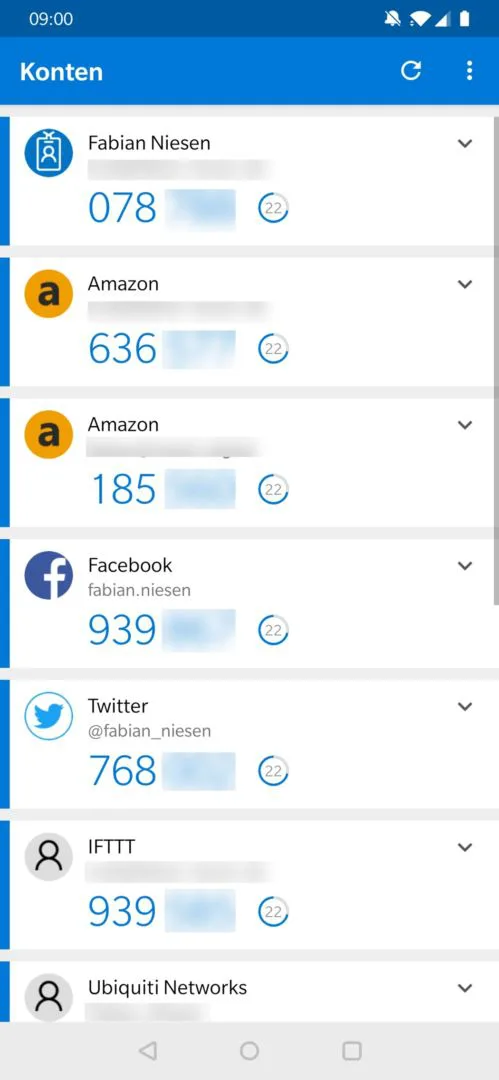
The most important factor is the Microsoft Authenticator, an app from Microsoft for mobile phones. The app is the core for many authentication options and is the most convenient way for the user.
Microsoft Authenticator Push Authentifizierung
The default method is the push notification into the App. The user is asked whether or not to approve the authentication. This even works with the Smartwatch, no need to take the smartphone out of your pocket.
Microsoft Authenticator Verification Code
As a fallback for regions with poor mobile networks or exhausted data volumes, the Authenticator also generates a one-time password (one-time password abbreviated OTP). This has 6 digits and the whole thing works similar to common hardware tokens, enter number and fine.
By the way, the app can also do this for many other applications by using open standards. For example for:
- Amazon
- IFTTT
- Ubiquiti
- Plesk Server
- WordPress Blogs mit Plug-Ins
- Microsoft Live ID (Live.com / Outlook.com)
And many others that support the corresponding standard
Phone authentication
The user receives a call on a previously stored and verified telephone number. He confirms the authentication by pressing the “#” key on the phone. The office telephone or private mobile phone is suitable for this purpose, for example.
SMS authentication
Here, the code is sent by SMS to a predefined telephone number. This is a good option for employees without a smartphone or fans of the Nokia 8110, but it is much more likely that the employee will use special mobile phones, such as explosion-protected ones.
Setting up Azure MFA
To set up multifactor authentication, please go to the AzureAD Portal and then to the user overview. There you will find the item “Multi-Factor Authentication” in the navigation bar. If you click on this item, a new tab will open.
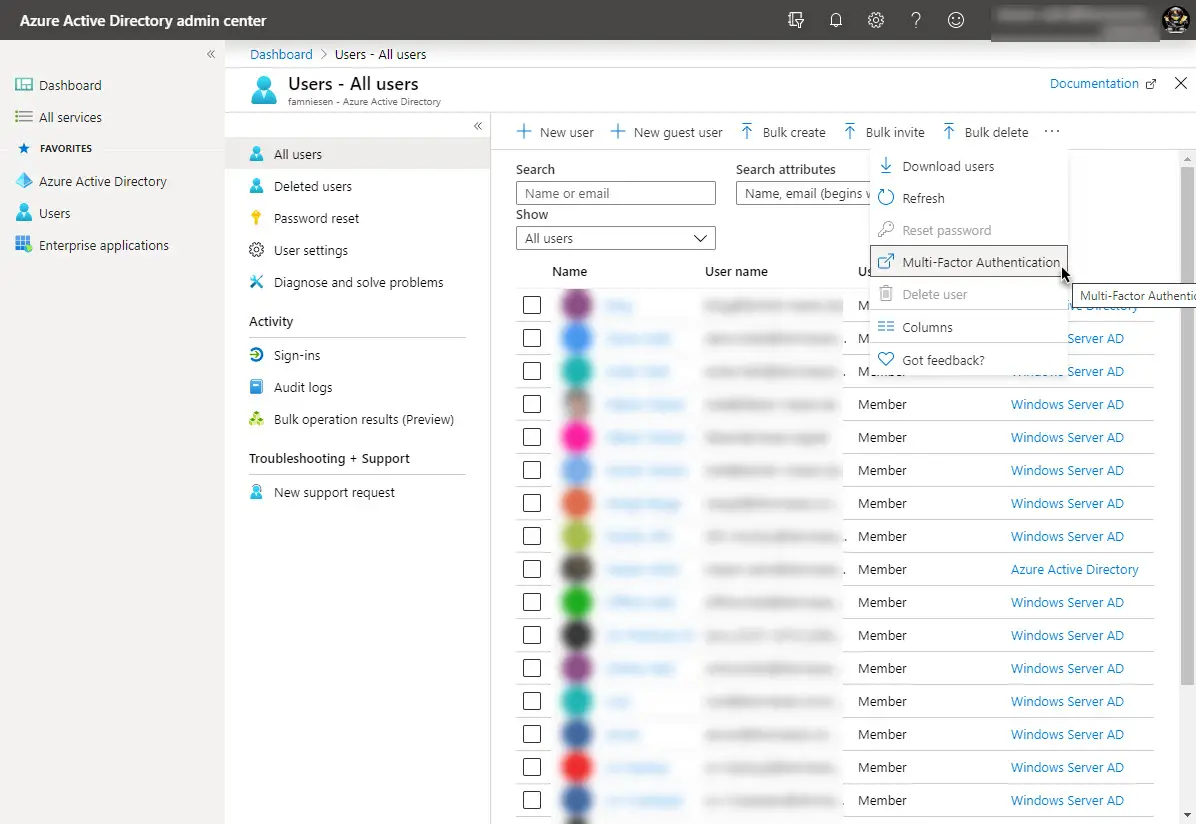
In this tab you first select the item “service settings” to configure Azure MFA.
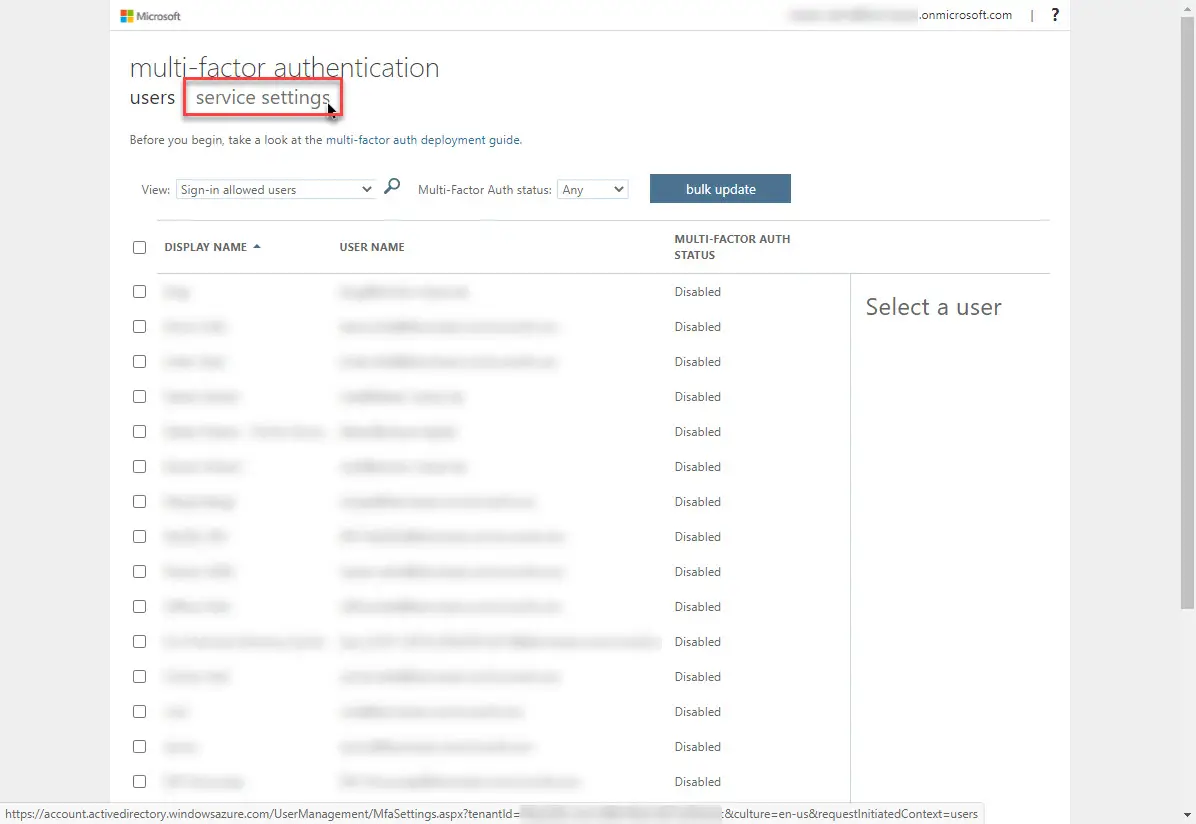
With these settings there are a few that are relevant and that I want to explain.
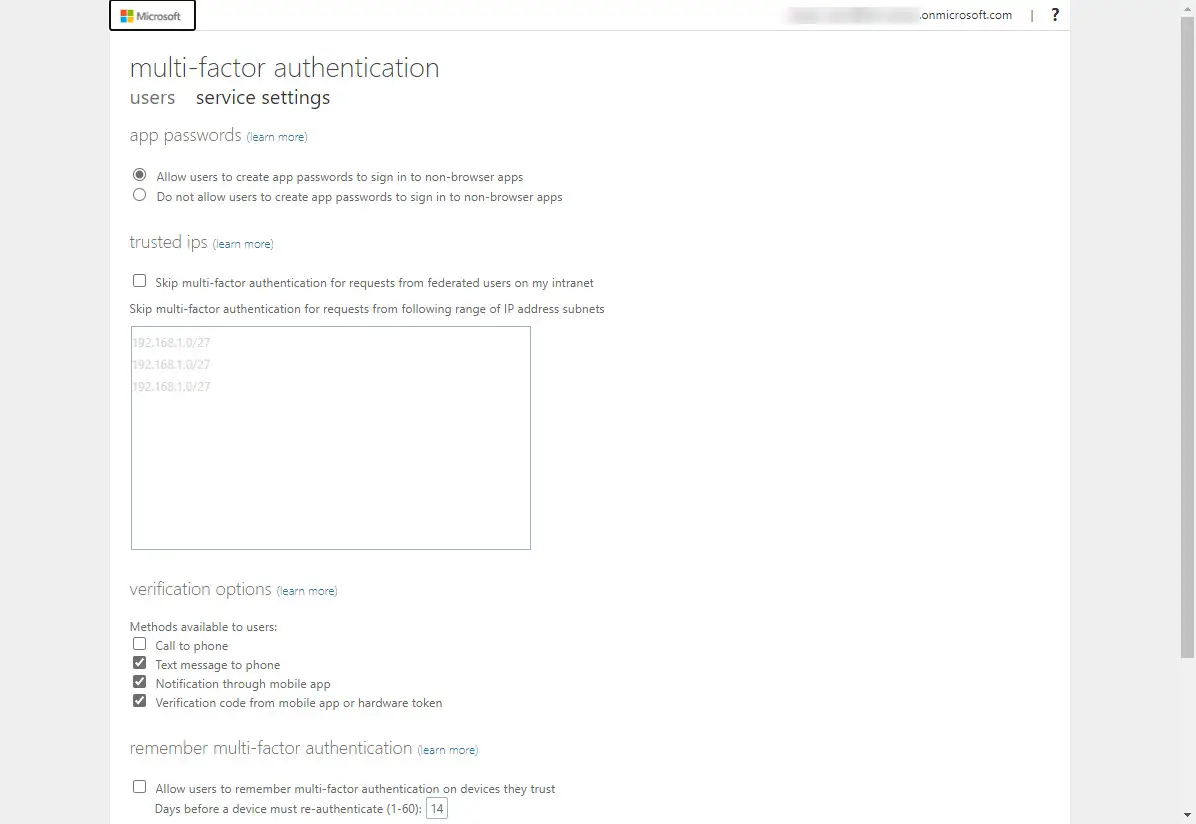
App Passwords
For applications that cannot use Modern Authentication, there are the so-called application passwords for compatibility. These are created by Azure and then entered into the application as a password. This bypasses Modern Authentication with MFA and Conditional Access. You should, therefore, consider whether to activate this function. I would disable it until it is needed. More about this at Microsoft Docs.
Trusted IPs
Here you can define your IP address ranges. These do not require MFA authentication. More about this again at Microsoft Docs.
Verification options
Here you can select the verification options already explained. For example, you can disable phone or SMS verification here.
Remember multi-factor authentication
This gives the user the possibility to avoid the multifactor registration for this service from the current device for up to 60 days. This can be particularly convenient for frequently used websites. But only if it is not a computer in the hotel lobby. The user and the administrator can discard all existing memorised MFA via the AzureAD.
Activating the first users
When you return to the user overview of the MFA page, you can activate the users. Of course, you should inform the users in advance. To set up the users, they must then go to the page https://aka.ms/MFASetup after you have activated them.
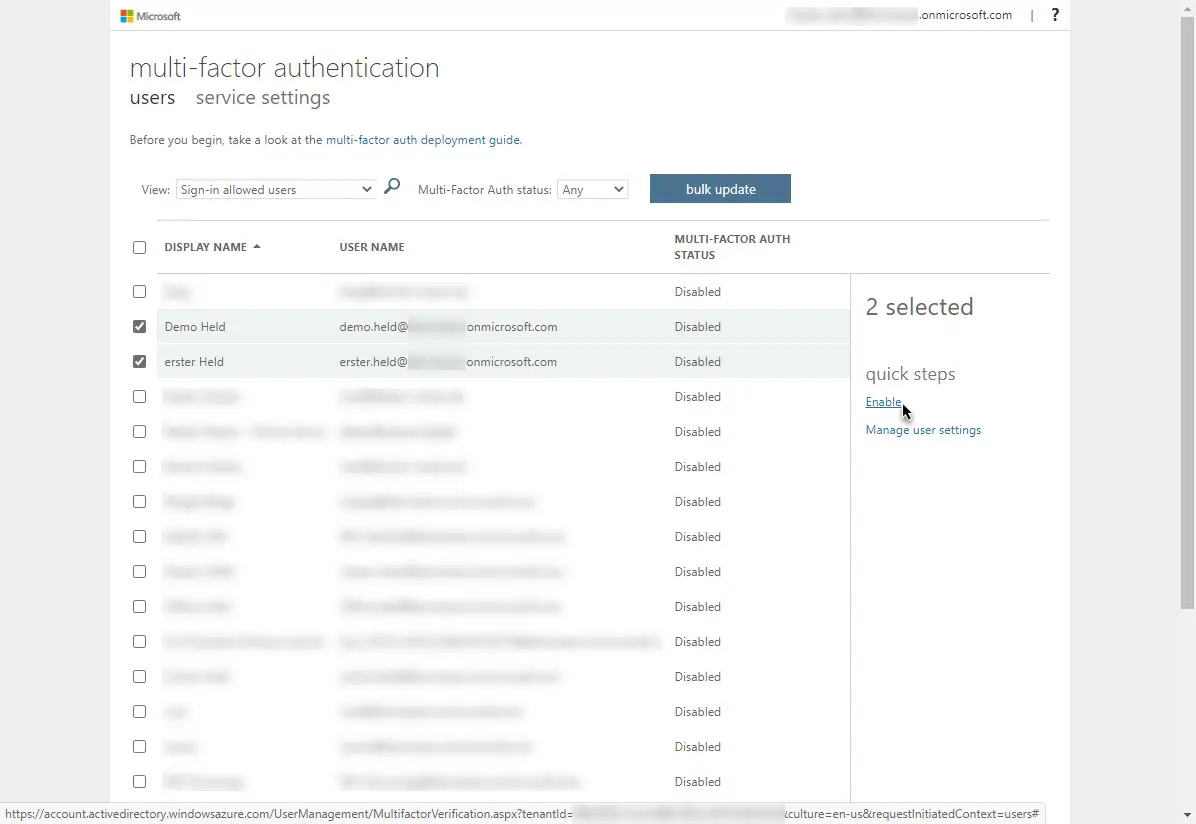
You can also upload a list via the “Bulk Update” button. When activating the MFA for the users, a note with the link to the setup will be displayed again.
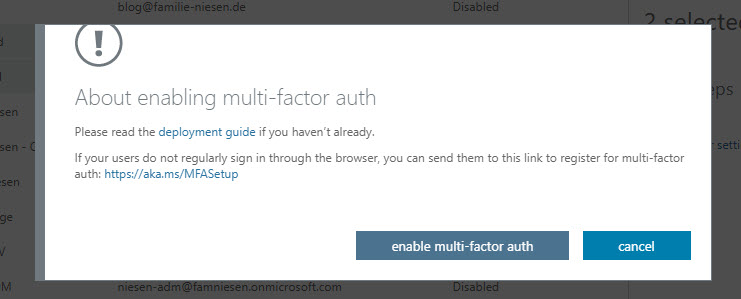
As soon as the user is enabled, he will be displayed as “Enabled”. As soon as MFA is set up, “Enforced” is displayed. So you can also check who has already set up MFA.

Activating the MFA for Azure AD is as simple as this. It becomes complex when other systems are to be integrated. Therefore it is important to plan the MFA introduction. Especially if you want to authenticate non-Microsoft cloud services via AzureAD.
Set up company branding
Of course it is good if users feel at home right away. Therefore, the login should also be customized. This way, users do not see the Microsoft standard, but the customized login for your company. Again, this is not valid for AD-FS. Nevertheless, you should also configure it. For certain services, for example Microsoft Autopilot is a requirement.
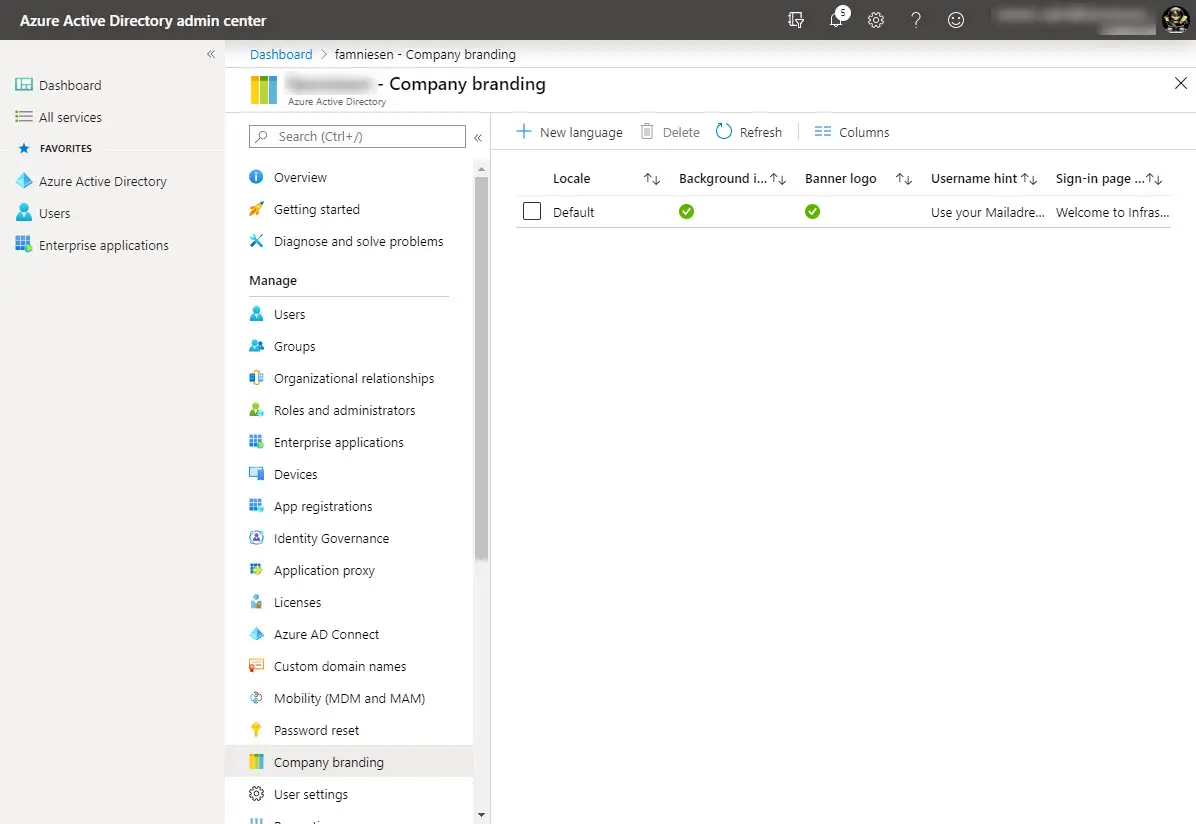
To set this up, please go to the Azure AD Portal, where you will find the item “Company branding” in the “Manage” section.
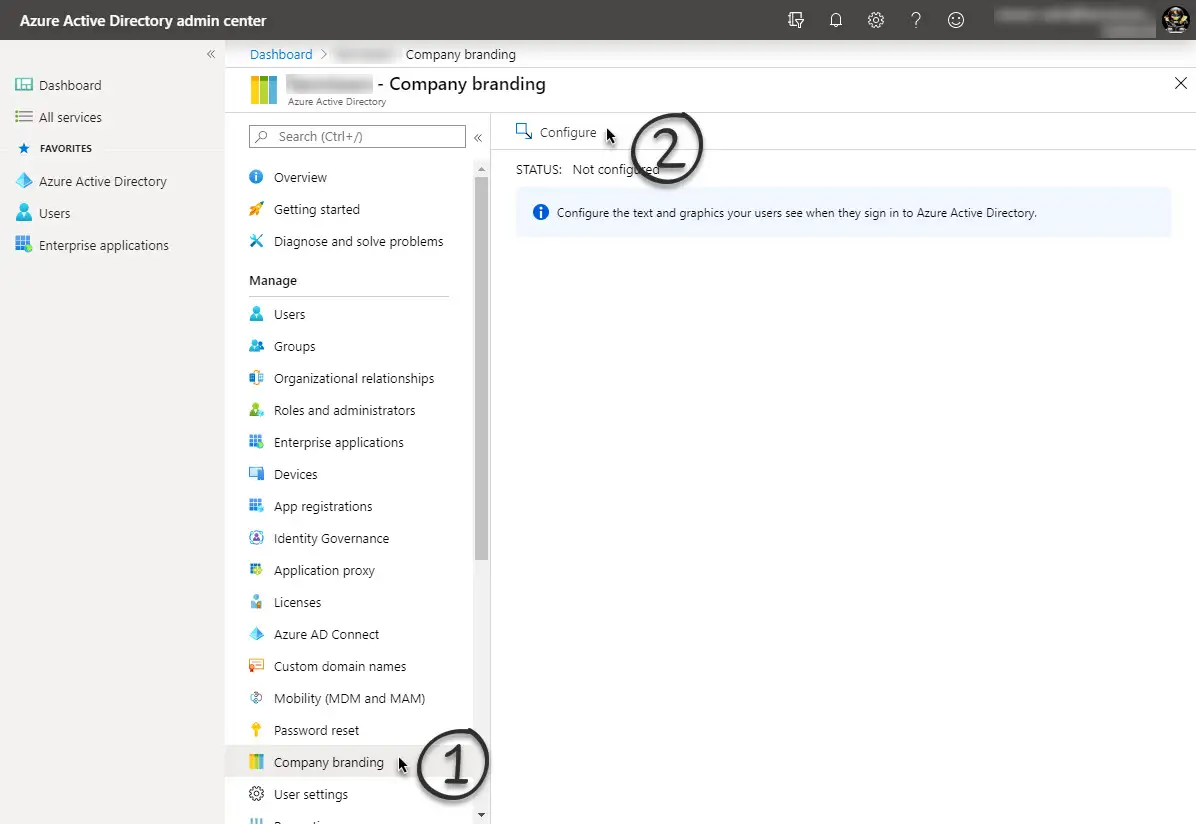
Then select “Configure” to set up the company branding.
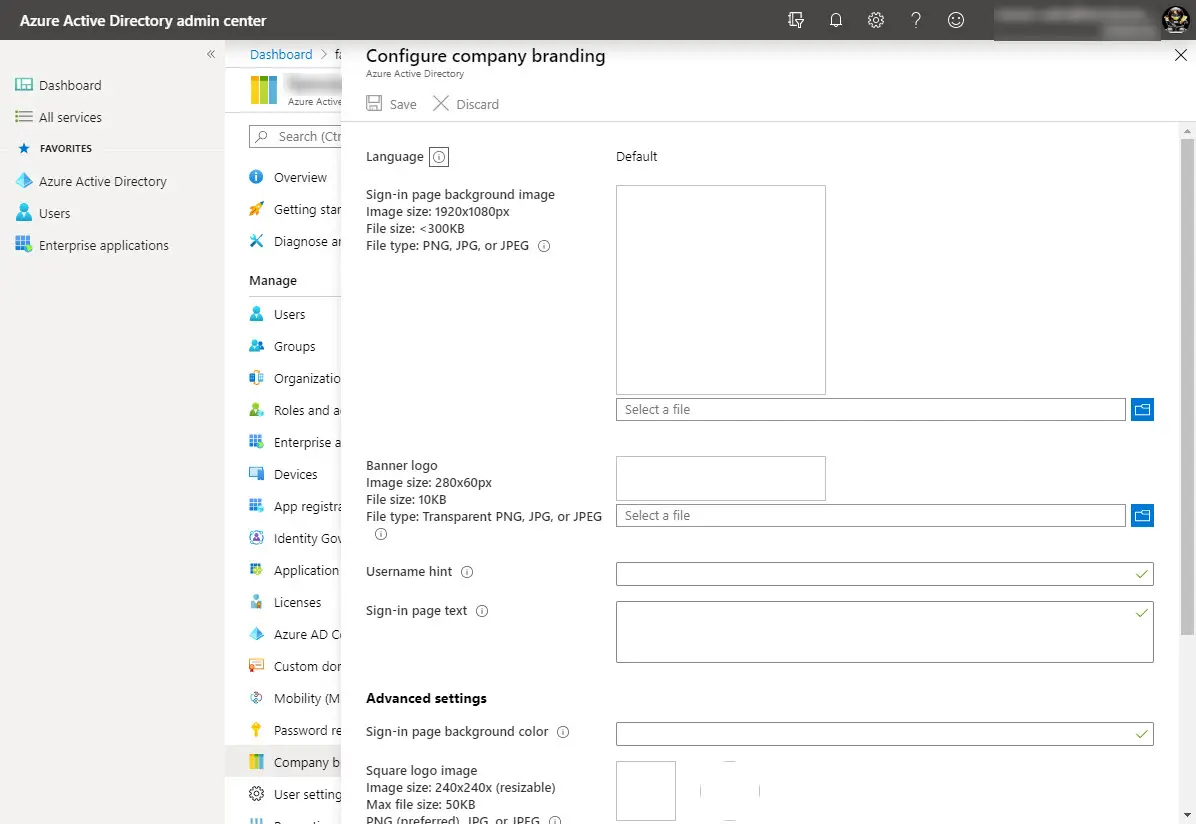
What can / must be configured. Ideally you prepare the graphics beforehand.
- Background for the login page (1920x1080px, max. 300KB, PNG, JPG or JPEG)
- Banner Logo (280x60px, max. 10KB, transparent PNG, JPG or JPEG)
- Square logo (240x240px, max. 50KB, PNG – preferred, JPG or JPEG)
- Square logo for dark themed logins (240x240px, max. 50KB, PNG – preferred, JPG or JPEG)
Also, there are some texts that can be displayed to the user. Of course, there is the possibility to make different settings for different languages.
- Tip for the user name
- Text for the login page
In addition, the background colour can be stored as RGB code. It can also be adjusted whether the option to stay logged in is displayed.
Afterwards, the default language is set and others can be configured.
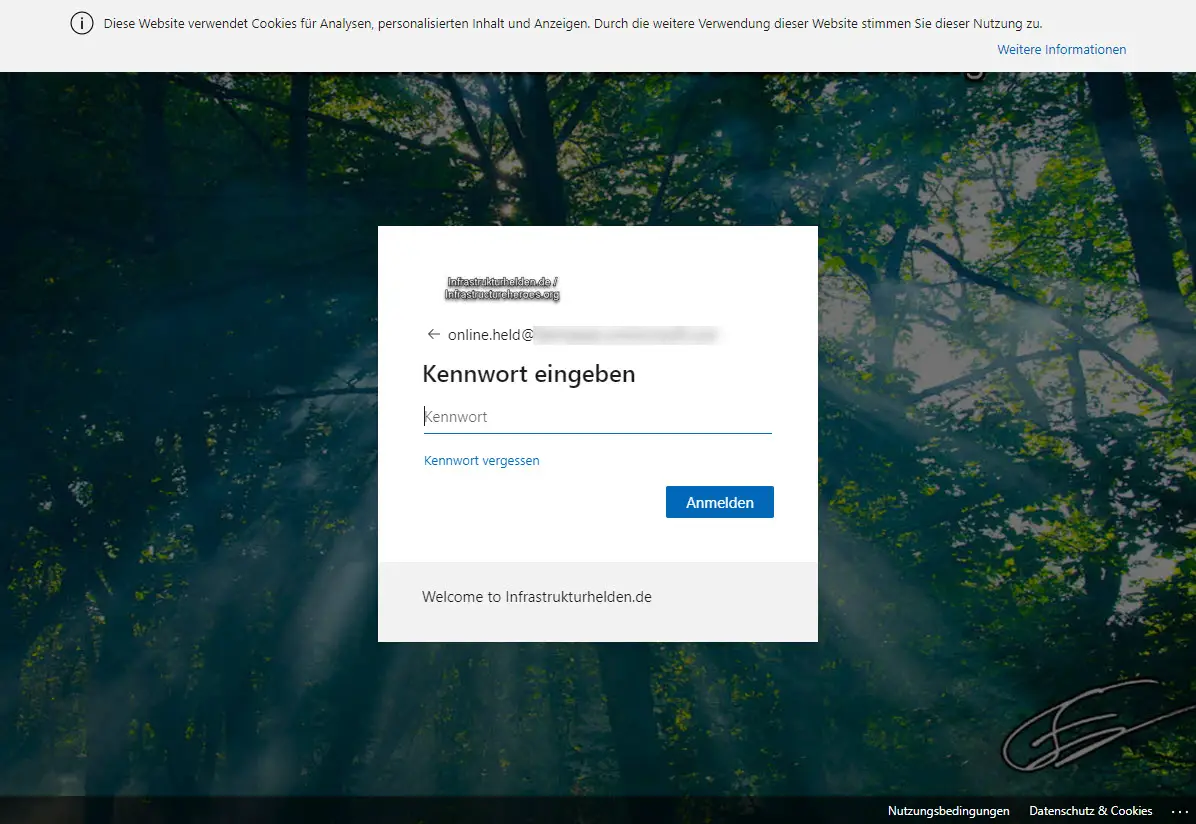
After entering the User ID, the user sees the input mask for the password adjusted accordingly.
