Since I’m very busy with deployment and rollouts, I thought I’d write a few basic articles that I could refer to. This sometimes saves you some time in workshops for the more interesting things or gives administrators incentives to automate things.
WIM files, what are they?
Some of you may be thinking. Windows Image Media have been in use for installations since Windows 7. It is a container with data, similar to a VHD file. These WIM files are used for different types of installations, for example:
- DVD media
- USB installation
- Windows Deployment Service (WDS)
- System Center Configuration Manager (SCCM)
- Other installation tools like ZCM, Baramundi and Co.
- Microsoft’s small function to convert WIM files into VHDX files for virtual machines. I use this partly in my scripts.
If you ask yourself now “why should I do the editing”, please install Windows 7, 8, 10 or Windows Server 2012R2/2016 with a “Release to Manufacturing” (RTM) disk, i.e. the first official version, and then install all updates. But it can also be useful to include required drivers directly or to activate or deactivate Windows features in the image.
In the past, there were simple ways to create “up-to-date” disks, this was called a “slip stream CD”. And yes, it still works today, among other things. Customers with volume licensing contracts can also download updated disks from the Volume Licensing Portal, but these are usually only updated once a year.
WIM images are containers with partitions. For the installation usually 2 different WIM files are used. The Boot.WIM contains the Bootable Installer with everything needed for the installation program. The Install.WIM contains the files for installation. For example, an Install.WIM of Windows 10 can contain different editions. This saves the space on the installation media.
What else can you do with WIM files?
Many things, besides adding Windows updates, can also be added, for example drivers. Here are a few more points:
- Adding an automatic answer file
- Adding or removing Windows features during installation
- Importing a Windows Key
- Adding more files
- Remove Windows 10 Apps
All of this can also be achieved with the Microsoft Deployment Toolkit (MDT), but for some customers this is too much effort or cannot be automated enough.
One possibility would be to create a PowerShell script that automatically maintains the installation image.
Edit WIM files with PowerShell
Note about program and Power Shell Code
The code contained here serves as an example. I do not assume any warranty, guarantee or support for the code or its components. Use the code at your own risk.
I always recommend to have a close look at the scripts before using them.
There are some commands around the WIM files, here are a few with examples that I often need. The link to the complete list with explanations can be found at the end of the article:
Displaying the index in WIM files with Get-WindowsImage
Get-WindowsImage -ImagePath $WIMorg | Select ImageIndex,ImageName,@{Name="ImageSize (GB)";Expression={[math]::round($_.ImageSize/1GB, 2)}}

Here is the result for the Install.WIM for Windows 10 1809 Business Editions Here you can also work well with where filters to always select the Professional or Enterprise editions regardless of the arrangement of the editions.
$ProIndex = (Get-WindowsImage -ImagePath $WIMorg | ? { $_.ImageName -like "Windows 10 Pro" }).ImageIndex

Mounting of WIM files
Now that we know the index, we can mount this index for editing. This is done with the command “mount-WindowsImage”. Mounting it into the directory takes a moment because the WIM files are also heavily compressed. By the way, if you get an error message with the text “Mount-WindowsImage : You are not allowed to mount and modify this image”, you should not try to mount the WIM file directly from the DVD or ISO. The change cannot be saved on the DVD or ISO.
The command could look like this:
Mount-WindowsImage -Path "C:\Temp\wimtemp" -ImagePath $WIMorg -Index $ProIndex

Adding updates as CAB packages and MSU files
Supported Cabinet Files (CAB) or Standalone Windows Updates (MSU) files can be installed using the Add-WindowsPackage command. It is important that the correct order for dependencies for the specific updates is used. If the update files are named with an order, you can make life easy for yourself. Alternatively you can try the “CreationTime”:
$Patches = ls $PATH -i "*.msu","*.cab" -r | Sort-Object -Property LastWriteTime
ForEach ($Patch in $Patches) { Add-WindowsPackage -PackagePath $Patch.fullname -Path "C:\Temp\wimtemp" -NoRestart -LogLevel Warnings -LogPath "C:\Temp\$date-DISM-$Edition.log" }
Not all MSU and CAB files can be integrated. The update catalogue can be used to download the updates. If this is too complicated for you, I recommend WSUSofflineUpdate.net.

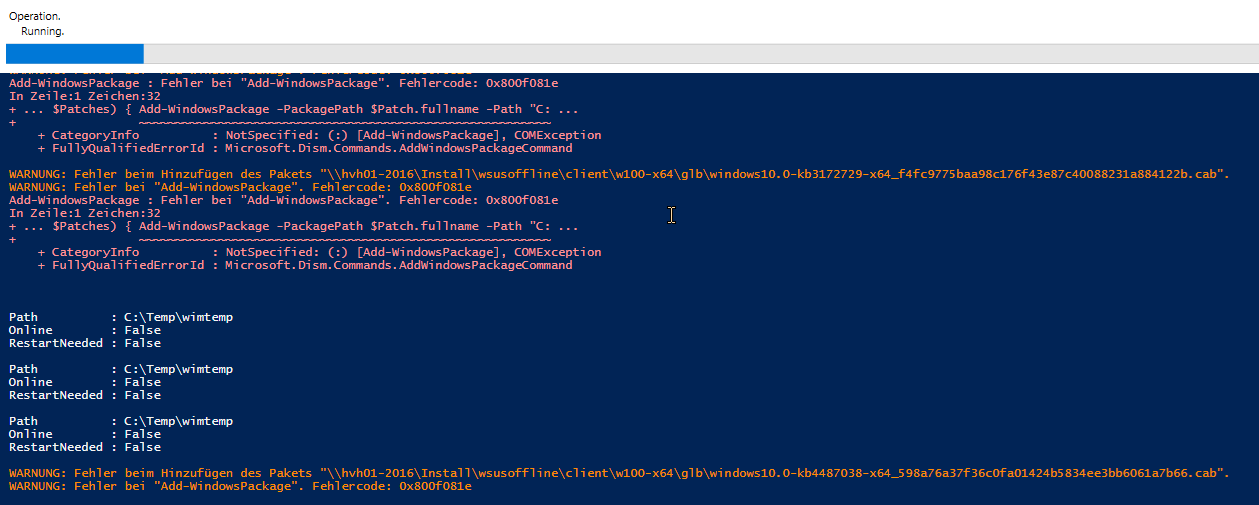
The error message 0x800f081e means that the update is not required. So this error can be ignored.
Install / uninstall Windows features in a WIM file
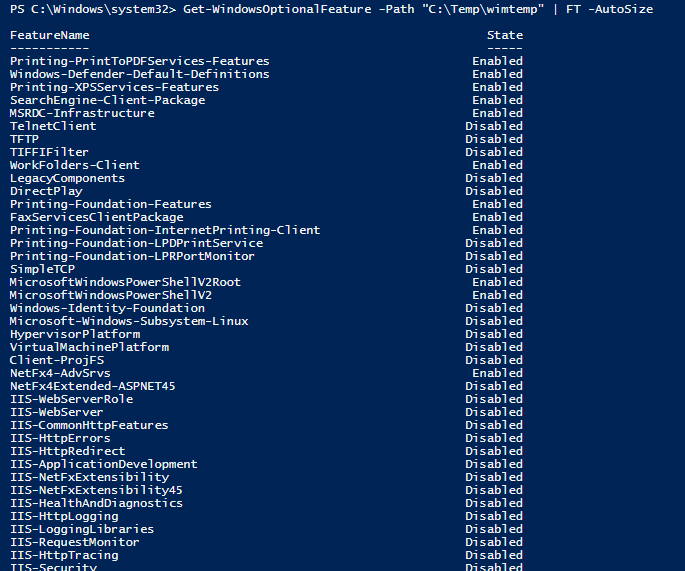
Of course you can also enable or disable features in a WIM image. This is useful if you need .Net 3.5 or access to SMB1 servers, for example. A list with all features of the WIM image including technical names can be obtained with the command:
Get-WindowsOptionalFeature -Path "C:\Temp\wimtemp" | FT -AutoSize

The status “Enabled” or “Disabled” are self-explaining. But there is also “DisabledWithPayloadRemoved”, for example with .Net 3.5, which means that the sources are not included in the image and must be specified.
The command to enable access to SMB1 servers is for example
Enable-WindowsOptionalFeature -Path "C:\Temp\wimtemp" -FeatureName "SMB1Protocol-Client" -all

For the installation of .Net a source must be specified. This can be done using an SXS share or the appropriate DVD/ISO directory (D:\Sources\sxs). The corresponding command is:
Enable-WindowsOptionalFeature -Path "C:\Temp\wimtemp" -FeatureName "NetFx3" -all -Source D:\sources\sxs

To also provide an example of switching off, here is an example of deactivating the XPS printing function:
Disable-WindowsOptionalFeature -Path "C:\Temp\wimtemp" -FeatureName "Printing-XPSServices-Features"

Removing Windows Apps from the image
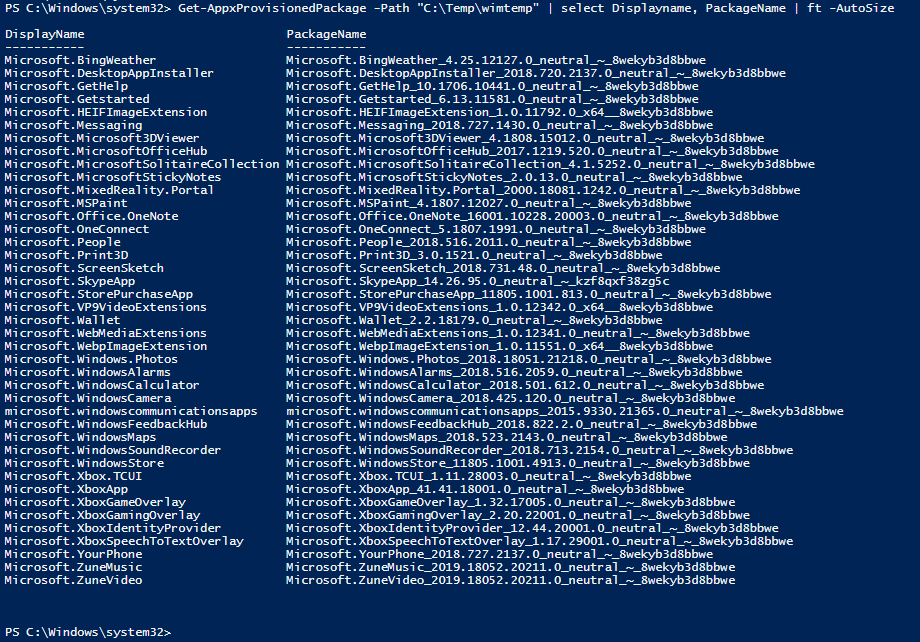
First of all it must be clarified which applications are present in the image. For this purpose there are the PowerShell commands from the “AppxProvisionedPackage” series. To find out which Appx applications are in the image, the following command is suitable:
Get-AppxProvisionedPackage -Path "C:\Temp\wimtemp" | select Displayname, PackageName | ft -AutoSize

Where clauses are again recommended for removal:
Get-AppxProvisionedPackage -Path "C:\Temp\wimtemp" | ? { $_.DisplayName -like "Microsoft.Xbox*" } | Remove-AppxProvisionedPackage -Path "C:\Temp\wimtemp"

Important notice, not all apps can be removed this way.
Saving the WIM file
After modifying the WIM file, it must be saved. This can be achieved with the Dismount-WindowsImage command. The syntax is:
Dismount-WindowsImage -Path "C:\Temp\wimtemp" -save -Verbose

WIM finished and now what?
The finished WIM file can now be used, for example in WDS or in a boot medium.
If you now want to optimize something, you can take a look at the following commands for further optimization:
Add-WindowsDriver: Adding Windows Drives to the Image
Remove-WindowsImage: Removing unneeded partitions in WIM (For example the “N” editions)
All PowerShell commands for the DISM module can be found at Microsoft DOCS.

